Electrolytic Etching of Brass
Jake von Slatt — Wed, 01/10/2007 - 06:07
Update: I'm often asked about the thickness, type, and source of brass I used for these journals. I am very lucky to have a local place, Metal Source, were I buy most of my supplies. I used 22 ga. (.025") brass and any alloy will do. In a pinch you can buy brass door kick plates at your local home center, but you will need to strip the lacquer. If you can't find any local source you can buy online, but this is the most expensive option.
A while ago I saw Mark Frauenfelder's limited edition Moleskin notebooks on BoingBoing and immediately thought of using the electrolytic brass etching process that I've been experimenting with to make some similar notebooks to give as gifts this year.
As you can see they came out quite well and the Moleskin's two century history lends the project a certain Steampunk street cred.

This is a technique I adapted for easily impressing images into brass plate. I say "impressing" but what I'm actually doing is electro-chemically etching the brass. Here's the process:
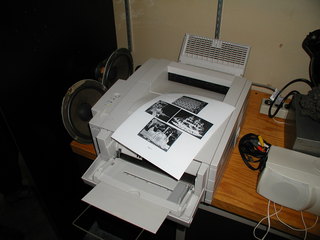
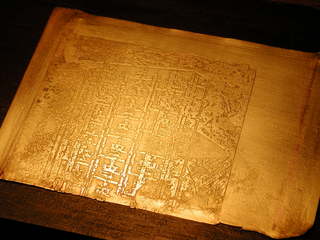
First we use a laser printer to print a negative of our image onto a sheet of inkjet glossy photo paper. Yes, I did say inkjet paper, this is an "off schedule," use as they say in the pharmaceutical biz.
Next we throughly clean a piece of brass with Scotch Bright and then scrub it with alcohol until it's completely clean. Several alcohol scrubbings will be needed to remove all of the dirt.

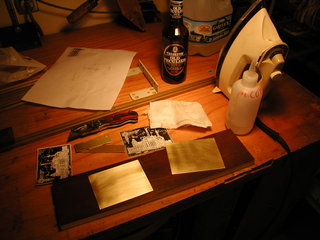
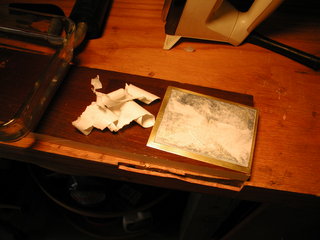
Next we use an iron set to it's highest setting to melt the toner onto the brass plate. Press hard on the iron and move it around a bit. I used the roller pictured to further press the paper against the brass. Total heating and rollering time was about 2 minutes.
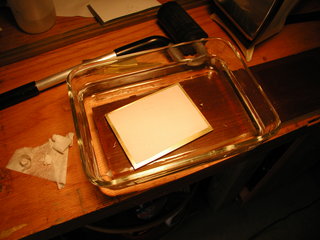
Once you are satisfied that the toner has been completely melted onto the brass, drop the plate into a tray of hot water. The water soak is intended to soften the inkjet photo paper backing so that it can be peeled away from the toner now stuck to the brass.

This is actually a technique that has been developed by hobbyists for making electronic printed circuit boards. Please see the bibliography below for the source and for more detailed information on this part of the process.
Once the board has soaked for 5-10 minutes, take it out and gently try and peel back some of the now softened paper. After peeling off a layer, return it to the water.

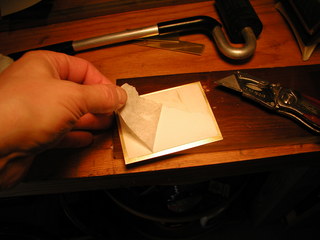
Once you get most of the paper off you can us a stiff brush to remove the remainder. You want nothing left but bare brass and toner.

Now we come to the neat 19th Century technique called Galvanic Etching. You may be familiar with the technique of electro-plating, where a metal object is plated with a layer of another metal by placing it in a bath with a source of plating metal and running current through it.
This is exactly the same thing except we connect our piece to the positive terminal because we desire to remove material from it. This technique was developed in the 19th Century for creating etchings and is still in use today. Again, please see the bibliography for resources.

My research indicated that a copper sulfate solution could be used for etching both copper and zinc plates. Since I wanted to etch brass and brass is an alloy of copper and zinc, this should be the right solution for this project.
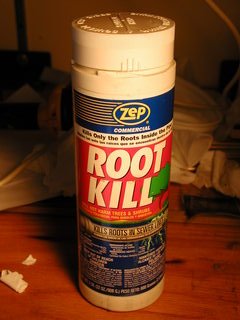
A little poking around in the garage and I found this container of "Root Kill" which is essentially all copper sulfate. I mixed about a pound of "Root Kill" into the water you see below. All of it dissolved so I probably could have mixed in a bit more. According to the sites I found, the more saturated the solution the faster the etch.
I made the holders for the brass plates out of brazing rod. I was aware that brazing rod is typically bronze and was hoping that the tin wouldn't mess things up.

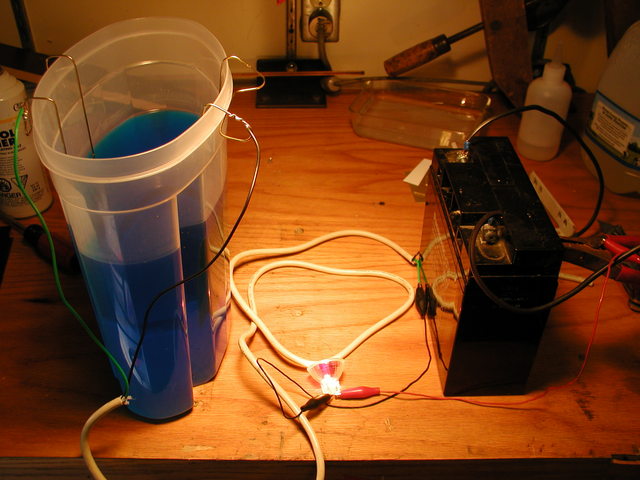
The work piece is connected the the positive side of the battery. I used a 12 volt 17 amp hour lead acid gel cell, but a car battery, battery charger, or modified PC power supply will also work. A lamp in series can be used to limit the current flowing through the electrolyte but I found that for the electrolyte I was using and the size of my plates it was not needed. Also, since I want a deep bite into the brass, I don't really need to be gentle.

After a minute or so nothing much was happening, though a brownish residue was forming on the work. I removed the light bulb from the circuit and moved the plates closer together. At this point the 16 gauge power cord I was using started to get warm and I could see the less dense hot water rising around the plates in the bath. I estimate that the current was between 10 and 20 amps. There were surprisingly few bubbles.

At this point things started happening more quickly. I took the plate out of the bath about every 15 minutes and brushed the brownish crud off. After about 45 minutes in the bath I noticed that some of the toner came off while brushing, so I took the plate out and rinsed it well. I used paint stripper to remove the toner but in another test I used steel wool under running water and that worked just as well.

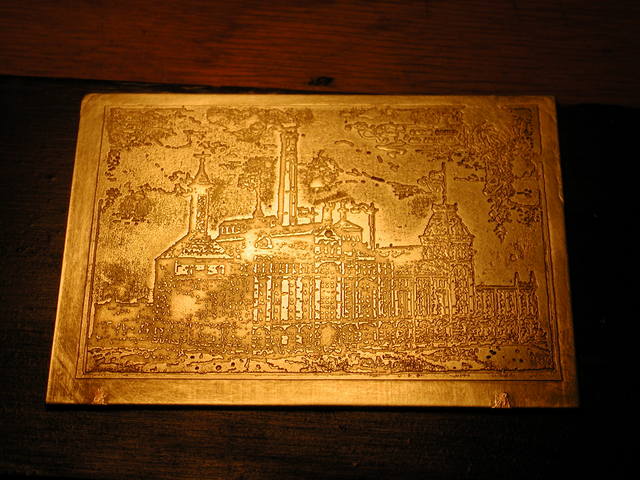
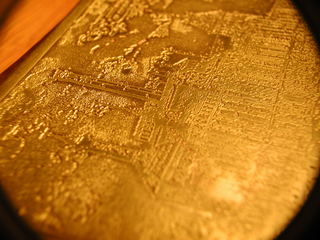
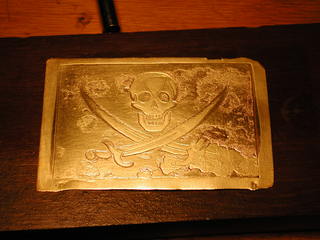
Here is the finished plate, I estimate the bath etched down about .5 mm into the brass. The material removal is very consistent and the lines where the toner was are sharp and clear.

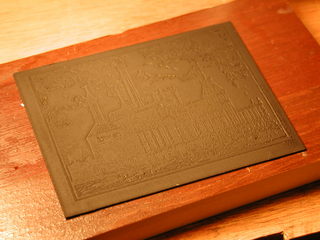
I sprayed the plate with black primer, let it dry, and used sand paper and Scotch Bright to remove the primer from the high spots. Finally, I polished it with some Noxon Metal Polish.

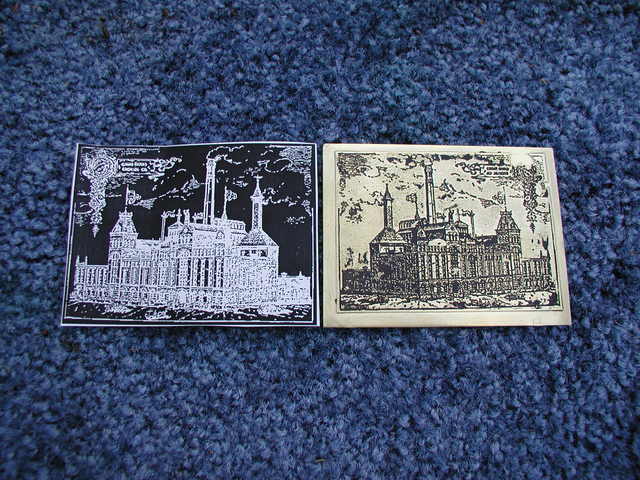
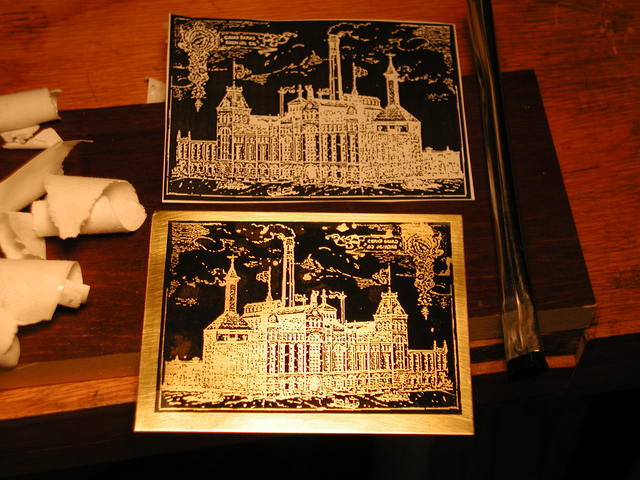
Here's a shot of the finished plate compared with the laser printed negative, you can see that the image is reproduced in the brass almost perfectly.
Below is another test plate that I made earlier, you can see that the lower right sword hilt is missing. This part of the image had been drawn in with a Sharpie and the ink apparently did not hold up to the solution. However, on the back you can clearly make out Charles Babbage's Difference Engine. I had ironed on that toner from a sheet of laser printable overhead film and had rejected it as not leaving a dense enough layer of toner on the brass, perhaps I'll re-visit that technique as it was very easy and fast and clearly has some efficacy.

A Note of Warning: There are some elements of this project that are dangerous and which this article does attempt to address in detail. However, Greenart has extensive information on this process and I urge anyone who plans on trying this to go there, read, and understand the detailed safety and disposal information. In particular you need to read the page on the Bordeaux Etch process as it covers the necessary steps for proper disposal of the spent solution. - Jake.
Bibliography:
Gootee, Thomas P. Easy Printed Circuit Board Fabrication - Using Laser Printer Toner Transfer, http://www.fullnet.com/u/tomg/gooteepc.htm.
Green, Cedric. Green Prints -Etching without Acid, http://www.greenart.info/galvetch/contfram.htm
Search
Projects
LCD Monitor
Light Switch Plates
Wimshurst Machine
MAC Mini Mod
Altoids Tin Etching
Lightbox
Guitar Amp
Lyra's Lamp
Shop Respirator
Etching Brass
Flash Diffuser
Bus Conversion
All-in-One PC
Motorbike
Etch Machining
iPod Etch
Headphone Mod
Steampunk Strat
Telegraph Build
Steampunk Car
Trilobite Etch
Kerosene Lamps
Trailer
Contact
- Twitter: Jake | Meredith
- Jake is on Facebook
- More of Jake's projects: www.vonslatt.com
- Meredith's Blog: ladycartoonist.com/
- Jake's Shared Google Reader Items
- Email Jake: jake@vonslatt.com
- Email Meredith: satiredun@gmail.com

Designs by Jake von Slatt on this site are licensed under a Creative Commons Attribution, Noncommercial, Share Alike 3.0 United States License.
Permissions beyond the scope of this license may be available here.
Your email will never be divulged and we will only make an announcement when there is a genuinely interesting new thing.
Login
Subscribe
Your email will never be divulged and we will only make an announcement when there is a genuinely interesting new thing.

etching questions
buffinfun — Wed, 02/03/2010 - 07:31has anyone ever tried this with a iron on transfer from a t-shirt shop?
if so what type works best ...on brass
im having a silk screen pattern made what type of screen size should be used?
also what type of ink should i use when silk screening.
would covering the back side of anode be a good idea to concetrate all the etch power to the front of anode?
i have a rectifier what should it be set at ? is the highest amp the best?
thank you hope to be etching by end of week 1/24/10
thanks again...... buffinfun@yahoo.com
Thanks
michaelaly — Wed, 12/23/2009 - 09:45Thanks for posting this information, as well as the link to GreenArt. My first try wasn't exactly pretty but I learned a lot, and I did get an etch using a car battery charger. I deviated from your instructions in 2 places. 1 ) I used a toner print on a transparency instead of inkjet paper. I don't have a laser printer so couldn't use inkjet paper, and using the paper from the print shop failed miserably. 2) I found a 5lb bag of pure copper sulphate in a local gardening store, it's used to control algae growth in ponds so anywhere they sell aquatic chemicals you can probably find copper sulphate.
The placement of the negative wire makes a difference. I only used one wire, suspended laterally across the rectangular plate, and as a result the etch is a bit uneven. I plan to use a grid in the future as suggested on GreenArt. I also didn't get a very deep bite after 45 minutes of etching using a standard craftsman car battery charger at 12 volts, I plan to increase my times in the future.
Again, thanks for posting this process, I'm a fine art photographer by schooling but I've been wanting to try something new. I've been wanting to etch plates with photographs ever since printmaking 101.
Mike
Mirroring
Gavin Carter — Sat, 12/19/2009 - 14:49So I didn't see this mentioned anywhere, but thought I'd give people a heads up - If your project involves text, be sure and FLIP the image horizontally before you print!!! Otherwise you'll be ironing on your text backwards, as I just did.
copper or silver
Duckblind — Fri, 12/04/2009 - 21:55This looks like a lot of fun. I am a jeweler and i have been making copper and silver pendants for people using photos they give me. However, I have been using ashpaltum to coat the surface, then scrape the image on by hand, and then coating or submerging in nitric acid. This is nice but a lot of labor is involved in the hand transfering of the image and I feel like I just shortened my life each time I use the acid. The inkjet technique would save so much time and headache. I have a small electro plater used for gold and rhodium plating but I dont know if it will be sufficient for this. Also, is there a solution that could be used for either copper or silver? Paul's idea for using the rolling mill also sounds very useful.
Alternative to brazing rods?
DynamoModels — Sat, 11/14/2009 - 19:44Hi Jake,
This is a fantastic how to and I'm really wanting to have a go at this to make some etched brass plates to use for adding designs to some silver jewellery which i'll apply by rolling the etched brass and a piece of sheet silver through a rolling mill.
My question is what metals can be used for the anode and cathode that wont get etched or effect the process as I'm having trouble getting hold of brazing rods (in the uk) that don't have flux on them?
I have all sorts of junk laying about (as all good model and prop maker should) and am sure I must have something that I can use.
Thanks again for a great how to, it seems so hard to come by any straight forward not overly technical info on this subject.
Paul.
Any copper wire will do.
Jake von Slatt — Sat, 11/14/2009 - 22:01Any copper wire will do. Actually, since it immediately gets plated with copper - steel coat hangers would probably work just fine.
You want to avoid any stainless or chrome on the side that gets etched as that will create very poisonous compounds in the solution.
Moleskine
yossarian — Wed, 10/14/2009 - 21:02Jake,
Did you just use an adhesive to attach the plates to the Moleskines, or did you do something fancier? If so, what sort of adhesive?
I used black GE Silicone II
Jake von Slatt — Thu, 10/15/2009 - 07:50I used black GE Silicone II Dooor and Windows sealant. It cures overnight so you get plenty of "open time" to position the plate. I don't know how 'archival' it is since it is decidedly not acid-free.
Toner Transfer
August Grey — Fri, 09/25/2009 - 21:24Hiya, Jake. I'm using a different etchant but the same materials, and the issue I'm having is of toner transfer. I printed my image onto glossy magazine paper yesterday, and today ironed it onto a superlatively cleaned brass plate for 5-7 minutes on high setting. To my surprise it transferred absolutely nothing. Would it be an issue of "freshness?"
Hmm, maybe. I found that one
Jake von Slatt — Sat, 09/26/2009 - 05:44Hmm, maybe. I found that one printer I had, an HP Deskjet 5L, was particularly bad at laying down toner. I currently use a Samsung CLP-300. The paper may an issue too, I'm having the best luck right now with the flimsy coated newsprint Sunday circulars come on.
If at first you don't succeed
August Grey — Sat, 09/26/2009 - 10:20Experiment within the bounds of safety.
Alright, we'll try a different medium. I can ask for "Sunday circular" paper and get the same product?
I also heard about using parchment paper on Instructables.
Did you ever find anything solid about tweaking printers to lay down more toner?
Or just buy a copy of the
Jake von Slatt — Sat, 09/26/2009 - 11:55Or just buy a copy of the Sunday paper for a lifetime supply.
It I will ingeniously,
mrdonk — Wed, 09/16/2009 - 15:39It I will ingeniously, necessarily make it one of these days
First try etching
SteamPirate13 — Wed, 09/09/2009 - 17:14Thanks Jake and everybody for the inspiration. For anybody's reference I used HP Brochure Paper 180g (for inkjet) from Staples with a laser copier from FedEX/KInkos and It transfered to the brass really well - heavy pressure is a must. It removed from the brass after only a slight soaking VERY easily. I didn't have so much luck etching, I was using a rather big piece of brass - 12"x4"x1/4". Harley Davidson trickle charger did not work. Harley battery was too powerful as I melted the terminals on it. Tried a 6v lantern battery from Radio Shack with minimal results. Anybody know if it is the voltage, amperage or the combined wattage that produces a stronger etch?
This is a clever method for
Jake von Slatt — Thu, 08/13/2009 - 12:11This is a clever method for getting a good transfer:
http://www.pulsarprofx.com/PCBfx/main_site/pages/tech_support/tips_n_tricks/1.html
In need of brass etching
bluemonkeyglider — Sun, 08/09/2009 - 09:13Hi Jake,
Your acid etching on brass is beautiful and exactly what I'm looking for. I am in need of assistance in acid etching a rather detailed photograph of a hang gliding launch ramp onto a .032 brass plate 10.165 inches width and 6.875 inches height. This plate will be mounted onto a 3.5 foot width by 2.75 foot height brass commemorative brass plaque.
Do you offer this service for a fee?
Many thanks,
Keith Atkins
Memphis
bluemonkeyglider@gmail.com
Hi Keith, I'm afraid I don't
Jake von Slatt — Sun, 08/09/2009 - 13:21Hi Keith,
I'm afraid I don't do commissions. Additionally, this process real only works for black and white line drawings, I don't know how to do a photograph with grays in it.
not acid etching....galvanic etching!
bluemonkeyglider — Wed, 08/12/2009 - 16:12Thanks for the reply, Jake. I am using a black and white photo. I had a negative image of my picture printed on high gloss photo paper with toner, at Kinko's. I ironed it on a piece of brass plate...about 5 minutes on high. I soaked it in water for 1/2 hour and the paper began to dissolve. I carefully began removing and resoaking the paper but the toner did not adhere to the brass. Note: I did clean the brass first with a scouring pad soaked in denatured alcohol.
Any idea what I did wrong?
Keith
There are a great variety of
Jake von Slatt — Thu, 08/13/2009 - 09:12There are a great variety of papers and printer toner characteristics out there and you just have to keep trying until you find something that works. I am currently having good success with the glossy newsprint paper that Sunday flyers are printed on. Just print over them, use a piece of printer paper with the top 3/4" folded over to make a "sled" so the thin paper will go through the printer. I have a Samsung 300-CLP printer which does a very nice job of laying down the toner. I have heard of people tweaking printer drivers to print all four toner colors at once to get a thick layer but I have never tried this.
ratio mix
Mike63126 — Sat, 08/01/2009 - 14:52love to try this, but what would be the mixing ratio of the sulfate solution?
It actually doesn't really
Jake von Slatt — Sat, 08/01/2009 - 15:56It actually doesn't really matter. The best thing to do is to use an ammeter and mix in copper sulfate until you draw at the limit of your power supply. A 12 volt 1 Amp DC supply works well. if you don't have an ammeter try a level teaspon in a quart of water and adjust from there.
Ferric Chloride Etching
Ekkill — Thu, 07/30/2009 - 13:10I found your site almost a year ago and found your work incredible. My wife and I had our first child about three months ago and she gave me a couple of links to jewelry that had babies footprints deeply etched into copper. This reminded me of your process for salt water etching and I revisited your website and found myself inspired to tackle making the jewelry myself. I decided to go with ferric chloride and use your technique of ironing on an image from a laser printer. Took my babies feet and turned it into vector art, ironed it onto a piece of brass bar, and two hours of etching later, I had two beautifully etched baby feet with my daughters first initial and the year on the back. I gave it to my wife for her birthday and she loved it.
Thank you very much for detailing your processes, and I hope to be able to contribute in the future.
Question about power sources, because I want to try the salt water etching: I have an ac-dc adapter with a 12VDC 1.2A output. Any problems using a source like this versus a computer power supply? Problems in maintaining current?
~Jason
I use a 12 VDC 1.0 Amp
Jake von Slatt — Thu, 07/30/2009 - 13:51I use a 12 VDC 1.0 Amp adapter now myself. Mix about 1 teaspoon salt per quart with plates that are about 2"x3" to get the right current draw or mix salt in gradually will measuring the current.
Toner cartridge
Peterson — Tue, 07/21/2009 - 06:10I’m wondering how seriously brass is different from copper, etching-wise. I used to believe it can be etched with ferric chloride, which is traditionally used for etching PCB’s. Ferric chloride is not as pretty as CuSO4, but it works without electricity, which is not bad at all.
making the mask
jay451 — Thu, 06/11/2009 - 14:44I have been trying to create a etched brass image as a gift for my wife. Everything is going as it should except I am having a very difficult time getting the image to transfer to the brass. Is there a type of photo paper that is better than the others? or am I doing something wrong? I acquired the brass sheet from a trophy store and cleaned the back which appeared to have a layer of wax on it. The front had a peel off protective cover which I removed and then cleaned with alcohol. No luck with getting an image to stick. I must be missing something.
First make sure there isn't a
Jake von Slatt — Thu, 06/11/2009 - 16:23First make sure there isn't a coating of lacquer on the brass, paint stripper will take it right off if there is one.
I have found that the very best paper to use for transferring is the shiny newsprint that Sunday circulars from such places Target and Best Buy come printed on. You'll need to make a "sled" out of a piece of regular paper by folding over the top edge 3/4" and sliding the flimsy paper under it to get it to go through the laser printer.
Heat with an iron and then gently rub the paper against the brass with a popsicle stick, rub in a circular motion all over the paper several times while hot then let it cool and soak in water until you can rub the paper off with your thumbs.
Paper availability
jay451 — Sat, 06/20/2009 - 16:15Your instructions were very clear includinf the part about the "sled". I have been have a problem finding a quantity of the paper, any suggestions? Thanks
This is great
bowlerhatman — Tue, 05/05/2009 - 00:20I have been blogging about my own etching for a school project, my topic was inspired by your wonderful work here. My blog is at http://frazer-makingstuffup.blogspot.com.
Paper remove
lukasW — Tue, 03/10/2009 - 12:42Greetings from Poland.
Super Blog
I added Citric acid, because paper remove easily
Sorry I don't good speak Englich
etching brass
craig — Fri, 02/27/2009 - 03:05In my preliminary tests, I used 'PH Lower' for pools/spas, essentially sodium bisulfate. I mixed several heaping spoonfuls in a small margarine container of water. It worked pretty good on my small test pieces. However I am using a different method of masking the areas of brass with spray primer and a stencil. So far so good.
casting,dying,etching
nagaraja — Fri, 01/23/2009 - 06:54dear sir,The Steampunk workshop,
i am basicly a commertial artiest,now i am doing nama plates & boards through
sticker works. after watching yours site im intersted in casting & dying ,and eatching up on brass and copper
with/ without chemical is it possible ?. how? can you guide me?
which kinds of metal? only brass?
johannesgj — Wed, 01/14/2009 - 18:10i am building some small synthesizers and want to etch some details on top of the metal boxes i found in scrapheaps around the cities - quite rustique.
is there any method or way to etch other kinds of metal than brass or am i in the wrong direction here?
hope for your help.
this btw is really a creative site.
cheers from denmark
johannes gårdsted jørgensen
I've done steel:
Jake von Slatt — Wed, 01/14/2009 - 20:04I've done steel: http://steampunkworkshop.com/altoid-etch.shtml
and Stainless: http://steampunkworkshop.com/ipod.shtml
using salt water as an electrolyte. I've also seen aluminum done with salt water.
White Film left after peeling paper
dtrainer — Fri, 12/19/2008 - 10:17Jake,
Yes, this thread is a bit stale but I finally have the time to start working on a project using this technique. I do have one question. After removing the paper from the brass plate, I still have a white filmy residue left on the toner in spots. I am assuming this is some kind of residue left over from the glossy film on the paper itself. Any suggestions on how to remove it without stripping any of the toner away? Also, I have a couple of spots where the toner came off where it shouldn't have. I saw you had tried a sharpie to try to rescue one image without much success. Have you tried anything new? I know Radio Shack used to carry circuit board etching kits at one time. In those kits, they had a pen of sorts for masking the raw board. Might one of those work in this situation?
Thanks,
Don
Hi Don, Don't worry about the
Jake von Slatt — Sat, 12/20/2008 - 10:10Hi Don,
Don't worry about the white residue, your main concern is that the brass areas be bare. I've been using some oil based enamel to touch up the plate before etching - have a look at http://steampunkworkshop.com/steampunk-strat.shtml for some more information.
Thanks for the tip
dtrainer — Sat, 12/20/2008 - 11:27Thanks for the tip. Im headed to Lowes to get some touchup enamel. I did take a kitchen knife to the exposed areas last night and made sure they were clear. I just wanted to make sure the residue wasn't gonna monkey up my etching solution. I'll post some pics when I get done.
Don
Getting reat results
exroadie — Sun, 08/24/2008 - 22:57Jake,
Thanks again for this article. After our initial conversations, I've been etching various types and sizes of images into brass and I have been getting fantastic results, with some modifications, the most important being that I do not quench the brass after ironing...let it cool naturally! Positive results increased 2x when I began to let it cool on its own and then carefully peeled. (I'm using the press and peel blue paper.). I'm etching images from 1/8"x1/8" (for inlays) to 8"x8" for mounting. The moleskine journals are very popular amoungst my friends...
The ironing seems to be the process that has taken me the longest to master. Using a very clean piece of brass (not touched by my fingers after the last cleaning), I place the brass and mask on a piece of 1x6 pine, and clamp it all together for a few minutes using various type of clamps trying to equally distribute pressure and fully cover the image. I then alternate with a tapered wooden rolling pin and the iron for a few minutes,and push out any air bubbles, then let it cool. The tapered dowel on the rolling pin is crucial; it allows me to target the bubbles and does not leave edge marks on the the transferred mask.With a 12A car battery, I soak for about 45-60 minutes and get about a 90% success rate. I can recover small blotches during the finishing process, but there is the occasionally the paper just does not adhere.
I've also found I can take small symbols - astrology, wicca, unitarian universalist, chinese characters, etc. and make small 1.5" square refrigerator magnets with them by etching plates of 10-12 at a time, cutting them up, and sticking 1" soft magnets purchased at the local craft store on the back.. Made for great holiday gifts last year!
Wishing nothing but the best of results in your shop,
Ross
Thanks for the kind words,
Jake von Slatt — Mon, 08/25/2008 - 16:16Thanks for the kind words, love to see some picture!
Attaching Plates to Notebooks
cbass377 — Tue, 08/12/2008 - 14:48What kind adhesive did you use to attach the etch plate to the notebook?
I use rubber cement
exroadie — Tue, 09/02/2008 - 14:20I apply rubber cement to both the journal and the back of the plate, let it dry, then carefully place the plate on the journal (when dry, you pretty much have one shot...don't misplace it!). A piece of paper between the place and journal is helpful (the dry rubber cement will not stick to the paper).
I used black GE Silicone II
Jake von Slatt — Tue, 09/02/2008 - 16:24I used black GE Silicone II Dooor and Windows sealant. It cures overnight so you get plenty of "open time" to position the plate. I don't know how 'archival' it is since it is decidedly not acid-free.
etching of brass
tripltlads — Tue, 08/12/2008 - 10:38Might this process work with color toners as well ?
Might make for interesting results should some traces of the color survive the process...
Wow - - I love the etchings
altenuta — Thu, 07/31/2008 - 21:13Love the work you are doing. The etching, your keyboard, the Strat and the LCD monitor are all I've seen yet, but I'm still working on seeing the rest. I'm really pumped to try the brass etching.
Etchings source
Gavin Carter — Wed, 06/11/2008 - 17:25Hi!
I loved this article when I first read it, but forgot all about it. I was browsing moleskins today and was finding myself dissatisfied with my choices, when I suddenly remembered this article. I'm now all pumped up wanting to give it a shot myself.
I was wondering if you had any suggestions for places to find etchings. Yours are lovely, but a few google searches have yielded mixed results at best. I suppose I will just have to keep at it. Apologies if you don't wish to reveal your sources publicly. I looked all over for an email address but couldn't find one!
G
Go into 'Advanced Image
Jake von Slatt — Wed, 06/11/2008 - 18:07Go into 'Advanced Image Search' and set color to black and white and image size to large, then start searching!
This might accelerate the etching
Marc LaViolette — Wed, 06/04/2008 - 18:18I appreciate the resourcefulness of your process. What great results. Having done this in a lab can I suggest that you completely cover the back of your plate with a polyurethane varnish. This will allow most of the electrical current to etch the front of your plate and not be able to etch the back. As it is now most of you etching is happening on the completely exposed back. With the same set up and the modification I suggest you should be able to etch twice as fast.
Copper etch/ brass etch
Keith_az — Wed, 05/28/2008 - 15:01We reproduced your experiment then modified it a bit. As you did later, we used table salt disolved to saturation. Instead of a battery, we used a battery charger limited to a 2 amp draw. The positive cable was attached to aluminium foil formed in the bottom of a plastic bowl. The negative cable was attached by a roachclip connector from Radioshack. In less than a minute, we had etched away half the unmasked metal.
Pumped with sucess, we etched a friends picture onto a brass key again taking less than 5 minutes from ironing on the mask to completed etching. Great stuff!
Hi Keith,Cool! I'd love to
Jake von Slatt — Wed, 05/28/2008 - 17:14Hi Keith,Cool! I'd love to see pics!JvS
Tech school project
Valdemar — Thu, 11/19/2009 - 04:09Hi Jake I have some questions / general statements.
I've been looking at this particular blog thread wanting to do something such as what you have done and finally settled on an idea two weeks ago. My plan is to do four plate etchings of brass and copper starting in about 3 weeks during my tig welding module in school that will carry over for at least 2 more mods. The project will be a custom built pc case with both side panels being comprised of two large brass sheets that will be etched and a face and top panel that will also be etched in copper and possibly some smaller pieces such as fan grills and drive tray covers. The two of the images will be color images changed to black and white from 35mm negatives and transferred to the brass sheets and this is where my question comes in at. How difficult is it to get say an 8x10 black and white negative image to transfer to the plate, these images will be of a person with one having added images placed around it past the 8X10 to act sort of as a picture frame border.
The top plate of the case will have a kind of open earth pit cut out as if people were digging an open pit mine and the bottom fell away and it will look down on an acrylic case filled with red liquid that will be churning over itself like a lava field. The front panel will have a near top to bottom rip in it similar to exploding metal and will reveal a lava tube cascading down, the dive bays will be offset to the right of the rip and set on their sides. My question for this design here is I have seen metal etching where the etched portion was blackened heavily and then all of it coated with two coats of a kind of lacquer, is the blackening part of the etching process or something that would be added after the fact? The blackened portion even through the lacquer was rough to the touch.
Given the size of the sheets which will probably be about 16X20 I know that I will need a large container and larger amount of chemicals for the solution but I'm not sure if I will have to go with a larger power source, what are your thoughts on this as well?
BTW the project is going to be called "Tormenting Agony ", its actually a bit of self therapy to put a face on a feeling.
The real key to getting this
Jake von Slatt — Thu, 11/19/2009 - 10:03The real key to getting this process to work is to practice with the materials you'll be using. There's a great variation in printers and papers and some just don't work. Even for very large pieces I've found you can use small power supplies and just a few tablespoons full of copper sulfate or even salt - it just takes a bit longer but you also get a nicer etch. The blacken your referring to is usually just paint that's been rubbed off the high spots. Have a look here (particularly my comments about newsprint paper) for some more info: http://steampunkworkshop.com/altoid-etch.shtml
And send me pictures when you're done!