Bridgeport Series II CNC Gecko/Mach3 Conversion
.JPG)
Last summer I bought a Bridgeport Series II milling machine. It was being sold by a local machine shop for a song because it had problems with the BOSS 6 controller. I found it on Craigslist and after confirming that the seller could load it on to my trailer I plunked down $1000 for it. You can read about the loading and unloading into my garage here.
.JPG)
This is a three phase machine so the first thing I did was order a CNC rated rotary phase converter. The original intent was to just use the driver electronics and replace the BOSS 6 LSI-11 based industrial micro computer from Digital Equipment Corp with a PC running Windows XP and ArtSoft's Mach 3.
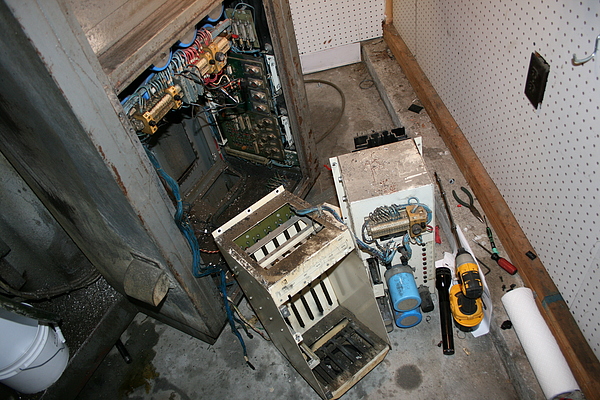
After stripping out the controller and its power supply there was plenty of room for a PC and the parallel port breakout board needed to interface the PC to the Bridgeport's driver electronics. You can see the Darlington transistor modules and driver cards at the back of the cabinet.
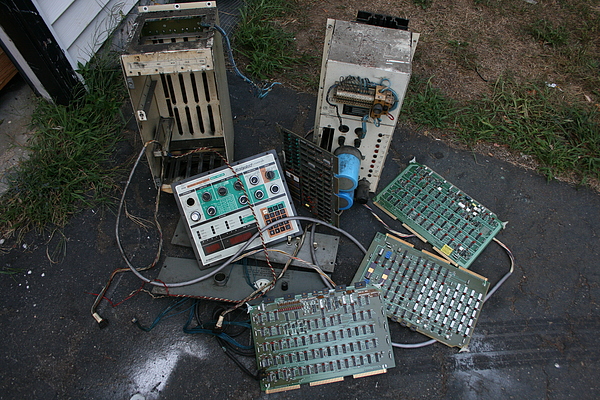
The discarded controller components.
Alas, this strategy proved impossible due to the fact that the Bridgeport driver electronics are somewhat delicate and require supply voltages to be in a narrow range, something that it's difficult to achieve with even a "CNC Rated" phase converter. I got the machine running for about 10 minutes before the outputs blew on both the X and Z axes.
I replaced the transistors and carefully adjusted the voltages, or at least tried to. It proved impossible to balance the outputs of the three phase transformer that served the axes power supply. So I decided to replace ALL of the Bridgeport's drive electronics with Gecko's G203V stepper drive modules.
The machine came with two cabinets, the large electronics cabinet on the side and a much smaller power cabinet on the back. I removed the large cabinet from the side and discarded it and then moved the smaller cabinet from the back to the side position so I could scoot the machine up against the back wall of my shop. In addition to the 90 volt axes power supply transformer the electrical cabinet also contained current limiting reactors for each axis that looked like transformers. Once these were removed there was plenty of room for the PC motherboard and other components.
But there was one problem, the Gecko drives need a power supply that delivered no more than 80 volts and the stock supply was reading closer to 90. It also proved impossible to get consistent voltages out of the transformer connected to the rotary phase converter so I chose to only use the two outer coils and connect them directly to the sigle phase 230 volt mains, their phases 180 apart.

To address the voltage problem I peeled away the outer insulation of the two outer coils and removed enough turns of wire to reduce the output voltage after the rectifiers to a safe 75 volts.

I re-used the original axis power supply filter capacitors and rectifiers to build the new 75 volt power supply.
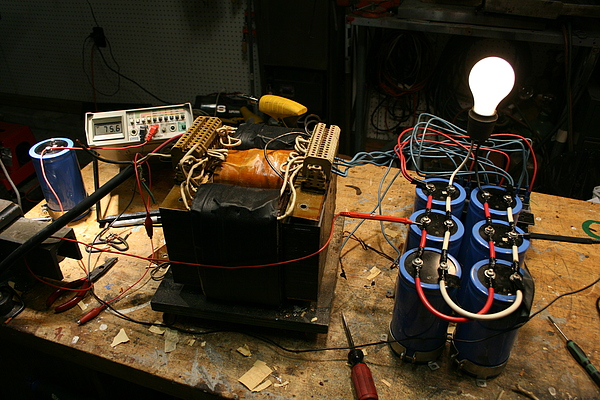
In addition to the 75 volt axes supply I needed a 24 relay and solenoid control supply and a 120 volt supply for the main motor contactors and the PC. I re-used the appropriate transformers for all of these and rewired the spindle speed controls an e-stop button to work with the Gecko's "Disable" input and the Mach3 controller.
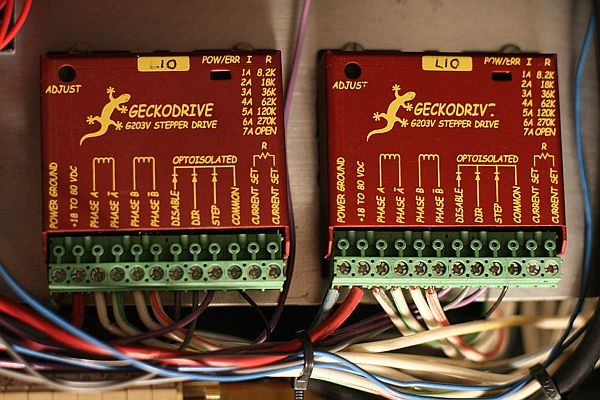
The Gecko drives are beautiful little things! Smaller than a deck of cards.
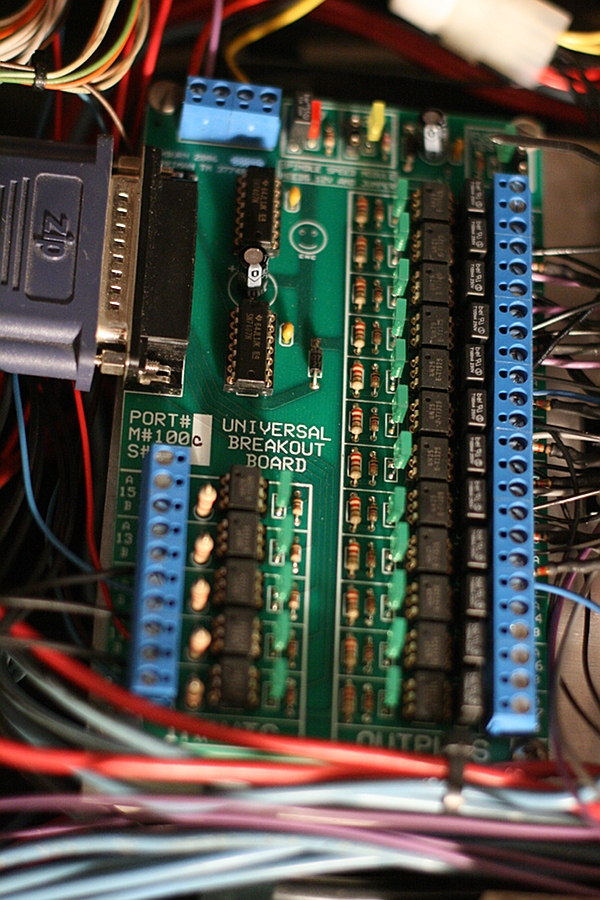
This is the parallel port breakout board (BOB) from Ashburn Industrial Repair, also referred to sometimes as the "Hill Billy" board on the CNCZone forums. This board comes with very nice instructions for connecting it up to the Bridgeport's original drivers if you are in a shop that has three phase mains.
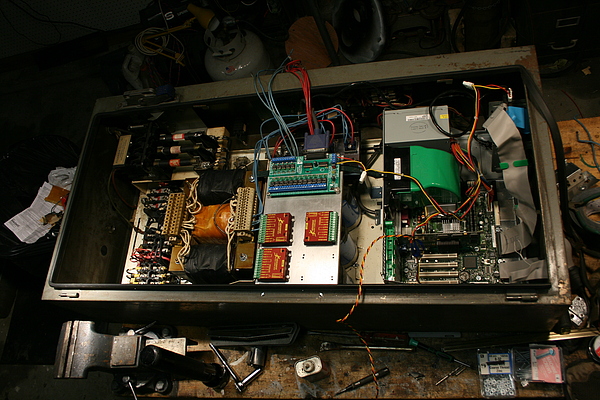
All of the components fit nicely in the smaller cabinet, the filter caps are under the heat sink for the Gecko drives and I've left a space for another one so I can add an "A" axis for a rotary table. At this point only the spindle motor requires three phase so if I had it to do again I would not buy the rotary phase converter and just use a VFD spindle motor drive.
The relays are all 24 volts so I built a little driver board with BUZ11 FETs to interface them to the breakout board. I'm only using spindle and coolant "on" controls so only two of the six channels are in use.

I used a television swing arm mount and some scrap aluminum to mount a monitor and keyboard . These were all rescues from a dumpster.

Configuration and final adjustment went surprisingly quickly and my CNC mill is ready for action…as soon as I learn how to program it.
How did the finished product turn out?
After reading your article i am looking to change my plans and some what copy your work if it is still doing good. If you can let me know that would be great.
Thanks
Joe
It’s working great!
http://steampunkworkshop.com/wp-content/uploads/61857ce632bc11e3a74122000aeb10b1_101.mp4?_=3
The only issue I’ve ever had is that when the shop was below 20 degrees F the y-axis would skip steps. Reducing y-axis acceleration in Mach3 config fixed that.
I think with a beefier power supply I could get a higher rapid traverse speed out of it (it does 60 IPS now) but with a quill that maxes out at 4200 RPM I don’t really see the point.
Jake.
Hi Jake,
I saw your conversion project and I wanted to ask if you would be able to help give me some pointers on my conversion I want to attempt. I have a Bridgeport R2E3 that is currently running all Anilam 1100m equipment and I wish to have it converted out to Mach3. The mill runs servo motors and I can only guess that the inputs are analog. I have heard that one can just go get a hold of a desk top computer and actually get a breakout board and wire that into the current driver controller for the servos, but I have no real clue as to what wires would go where. I would be more than happy to provide pictures and whatever else would be required to help give you an idea of what exactly is going on with the hardware.
Jake
I have no idea what the control electronics on that machine look like, they are quite different from the stepper version. However, I would suggest you start by looking at the Gecko Servo Drivers http://www.geckodrive.com/g320x.html and see if they are compatible with your servomotors. If so, your conversion should be fairly similar to mine.