Making Joints in Telescoping Brass Tubing: Slip fit Press-fit Detent-fit.
Many makers have found uses for the telescoping brass tubing from K & S Engineering. This tubing is available in sizes from 1/16" up to 21/32" (modeltool.com is one retail source), and one of the useful features of this material is that each adjacent size telescopes neatly into the next. I use the tubing to make small organ pipes and tuned bicycle horns, generally working with the thin-wall (.014") variety, and I have developed a few techniques to adjust the fit between adjacent sizes, making airtight slip-fits and press-fits of adjustable tension, and also snap-together fits. These techniques all involve stretching or compressing the brass, and they don't involve the use of gaskets or adhesives. Whatever the tubing is to be used for, these techniques might give a maker some useful ideas for future projects.
First I will describe how to make a firm slip-fit, which is what I use in tuning slides. The slide needs to be movable, but firm enough to stay in position when handling and playing the pipe. The diameter I would be using depends on what instrument I'm making, but let's say we are using the two adjacent sizes of 3/8" and 13/16". The pipes should be cut to the desired length with a razor saw and the ends of the pipes should then be filed smooth, and have the burrs removed. The outside edges of the tube can be dressed with the file at a 45 degree angle, and the inside edges can be pared clean with a pointed hobby knife. Then use a dowel to push a little ball of paper towel through the tubes, to clean out chips.
To adjust the tightness of the telescoping fit, you can now do one of two things, or both. You can flare the end of the inner tube or constrict the end of the outer tube. For flaring the inside tube, I use an old hand-forged iron punch with a tapered shank.

Tapered Punch
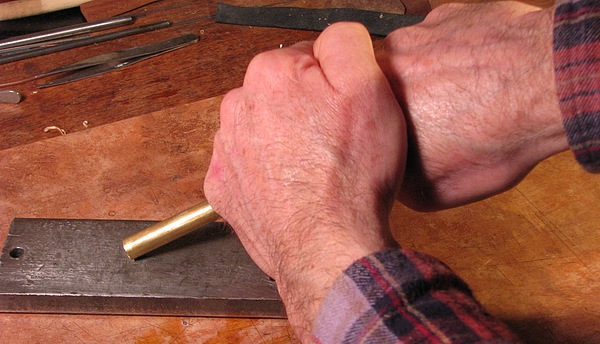
You can find these on ebay if you search for drift punch or tapered punch, or you can find them at flea markets that have boxes of old iron junk. Half of my empire is built from someone else's junk box, but luckily you don't need to be a scavenger for this particular operation. Most makers already have in their shop a pretty good tool for flaring brass tubing, and it's a long-nosed pliers; you will use it with the jaws closed. The closed jaws are rounded outside, and form just about the right taper. The cross section isn't exactly circular, but it doesn't have to be, because you will be twisting the tool as you push inward. Whatever you find to use, you will grip the brass tube in one hand and the tapered tool in the other, and twist / push the tapered tool into the brass tube,

Flaring the tube
forcing the end of the tube to flare out. Not much force is needed, and it is easy to flare too much and make the connection too tight. If that happens, you simply do the other thing, and constrict the flared end back down again. This you do by holding the tube at an angle against a steel plate or other hard surface, and rubbing the end of the tube, while turning it and pressing down, to burnish it around and shrink the flared end.
Shrinking the tube
If you haven't got a piece of steel plate, the back of an iron frying pan will work, or a piece of bar stock or angle iron. A block of hard maple will work too, using the end grain. Whatever you use should be polished smooth.
You can adjust the amount that you flare the tubing, to give you anything from an easy slip fit, to a hard press fit that will stay put. If you want a semi-permanent connection, you can both flare the inside tube and constrict the outside tube, so that each tube grips the other. If you do this, the tubes have to be twisted together at a slight angle to get the flare past the constriction, but once that's done and the tubes pushed together for an inch or so, you get a very secure joint. It also makes a unique connection that can be extended out to the end, but will stop itself from separating, unless forced.
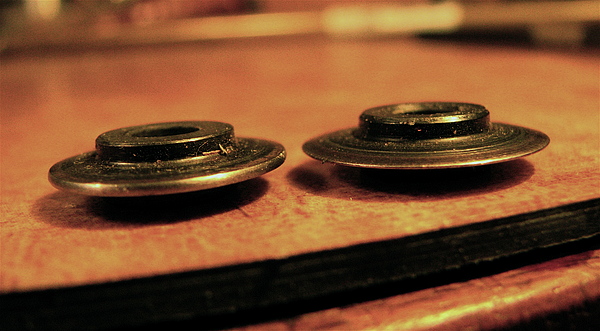
Now I will describe a completely different joint: a snap-together, or detent, joint. As before, this is made in two pieces of adjacent size telescoping tubing. This connection will slide together up to the detent, and then snap in place. It can be assembled and disassembled over and over.

The two parts of the detent joint, showing the rolled grooves
To make this joint you will need an ordinary pipe cutter, of the type with rollers and cutting wheel.

Pipe Cutter
You will want to get an extra cutting wheel for your tool (replacement wheels are easy to find at hardware stores), because for our purpose we are going to modify the wheel to have a blunt rounded edge, instead of a cutting edge. With this blunted wheel we are going to roll an indented groove around both pieces of tubing, to create the detent.
To modify the cutting wheel, remove it from the pipe cutter, and mount the wheel on a bolt with a nut. The bolt should be the largest size that will still fit through the wheel's hole, and of appropriate length to mount the assembly in the chuck of a hand drill, or a lathe. The wheel can then be spun against a coarse stone, or some coarse emery cloth backed up with a wood block, and then finished against some fine emery to polish it. You want a softened, blunted edge on the wheel.
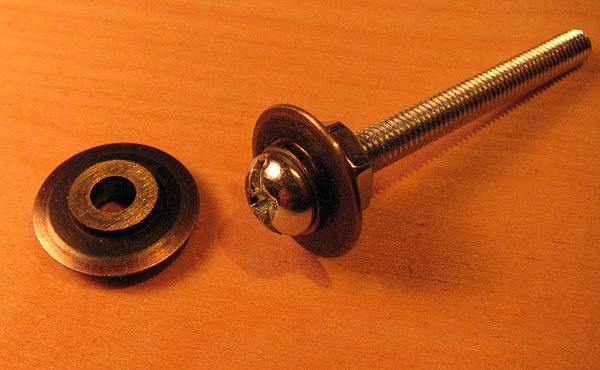
The modified wheel on a bolt & an unmodified wheel. Detail of the modified edge, compared to the sharp edge
Now remount the blunted wheel back into the pipe cutter, and you're ready to try this.
To make the detent joint, lay together the two pieces of tubing in the position you want the joint to be, and pencil mark the place where the detent groove should go; for example, 1/2" from the end of either tube, giving a 1" long joint. Take the inside tube, apply the modified wheel of the pipe cutter to the pencil mark, tighten it down a little and run the wheel around for a pass or two. Don't make the groove too deep, or you will cut or fracture the tube, even with a blunt wheel, and also the final joint will have more sideways play. Now put the pipe cutter on the outside tube, and run the groove on that; this is the critical one. It's very easy to get this groove too deep and make the tubes too hard to push together, and the detent, when it pops in, will refuse to ever pop out again. So do a very easy first pass or two around the outside tube, and try the fit. If you do get this groove too tight, you can loosen it again to some extent by peening it around with a light hammer. Put a piece of metal rod in your bench vise, with a couple of inches sticking out sideways to use as an anvil, slip the brass tube on the rod, and lightly peen it around the groove to flatten it inside. Getting the groove right will probably take a few tries, and you will probably end up with a couple of inches of practice tubing sacrificed to the learning curve; you saw off the bad end and try again, so practice as close to the ends of the tubes as you can.
When you get the groove tension just right, and you pop the joint together, you will find that there is some sideways play in the joint, even in its locked position. If you don't like this, you can take the process one step further, and roll a second groove in the outside tube, 1/16" from the first groove.

The double outside groove
By this means, you can make the detent lock together without any sideways play.
When you get a detent joint done to your satisfaction, rub a tiny bit of grease on it to make it happy. Your own projects will suggest uses for these connectors; for instance, they can be pressed into the ends of flexible PVC tubing to hook up the squeeze balls to your pneumatic one-man-band. I have some of these connectors that I made many years ago, that have worked for hundreds of assembly/disassembly cycles, and are still working as advertised.
I really want to thank you for this! While I may indeed make some antennas with the method, you’ve given me an answer to something that’s been difficult to overcome.
I build radio gear and have been figuring out how to make reduction drives and ‘vernier’ dials using string and pulleys. The shafts I’ve been using have way too much tolerance, leaving ‘slop’ in the controls.
Using your method not only takes the slop out of the rotation, but also eliminates the need for an external stop washer or bushing. It’s always nice to eliminate unnecessary parts!
Thank you again, I’ll send you some pictures when I finish my next one using your excellent technique.
I’m very happy that you found my article useful, and I would be interested to see pictures of what you’re working on. If you would like to see some stuff I’ve made, you can go to my website: http://www.bellowphone.com
From there you can get to my youtube channel, and also see photo galleries of some of my projects. Good luck with your own. lensolomon@bellowphone.com