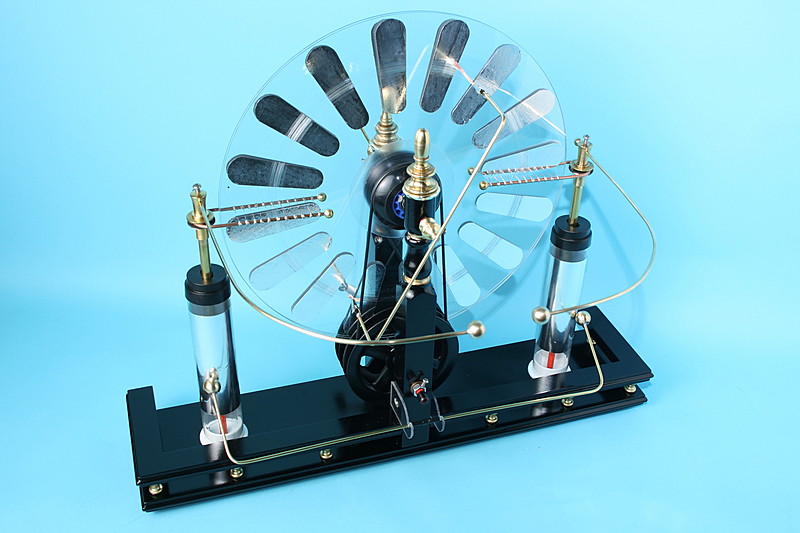
This is part two in a series of articles describing how to build a Wimshurst Influence Machine with parts and materials available at your local home center and hardware store. In this part I detail how to make a tool to cut the acrylic disks and how to prepare the drive components. If you missed part one you will find it here. This article was originally published in Make: Magazine volume #17
Part 2 – Making the disks and preparing the drive components.
This is a moderately difficult project. There is no single operation that is particularly difficult but there are a wide variety of techniques involved. You will likely find the soldering tasks to be the most challenging, but don’t fear, it’s easier than it looks, and if you practice soldering with some scraps before each operation, you’ll do a wonderful job.
Disks and Drive Components:
|
Make the cutting tool:
- To cut the two 14″ acrylic circles we will first need to make a tool. Cut a 12″ length of wood ¾” square. Pine will work but hardwood is preferable.
- Drill a pilot hole near one end and press or drive a #6 penny nail through the stick so the point sticks out about ¼”.
- Drill a second hole exactly 7″ from the first and insert another #6 penny nail into it.
- Use a fine metalworking file to shape the point of the second nail as shown. You want to make a chisel point with a slight undercut on the leading face.
|

wimshurst-circle-cutter-inset.jpg |
|
Cut the acrylic disks:
- Lay out your circles with a compass to be sure they will both fit on your sheet of acrylic.
- Drill a 1/8″ hole in the center of your circle. Be gentle when drilling acrylic, it cracks easily. Polycarbonate is quite a bit tougher.
- Working on a carpeted floor, insert the unmodified nail in the center and begin scoring your circle. Cut about a quarter of the way with each stroke and work your way around the circumference.
- If the cutter sticks, lift it out and move to a different spot.
- When you think you’ve gone about halfway through, flip the acrylic sheet over and cut from the other side. You may end up flipping the sheet several times before the circle pops free.
- Clean up the edge of the circle with some 400 grit sand paper and set them aside.
|

wimshurst-circle-cutter.jpg |
| Cut belt grooves in the skate wheels:
- Gently clamp or strap your drill to a workbench as pictured.
- Assemble a mandrel from a 5/16″ bolt and some large (fender) washers, when assembled the entire wheel must spin, not just the bearings.
- Chuck the assembly into the drill. The wheel should turn toward you and the speed should be fairly fast.
- With a crosscut bastard file make a ¼” wide flat on the wheel and then switch to a rat-tail file to cut the grove. Apply light and even pressure to the file.
|

wimshurst-skate-wheel-groove.jpg |
| Attach the skate wheels to the disks:
- Use a step drill bit like the one pictured to increase the size of the hole in the acrylic disk to 5/16″. Remember, be gentle and go slowly because acrylic is easily cracked.
- Remove the washers from the wheel and use the 5/16″ bolt to center the wheel against the disk.
- Drill (4) 1/8″ holes through the disk, don’t drill into the wheel.
- Switch to a 3/32″ bit and drill partway into the wheel in 4 places.
- Finish the holes with a counter sink.
- Now remove the 5/16″ bolt and drill the center hole out to ½” or 5/8″ using a step drill, you want the edges of the hole completely clear of the rotating parts of the wheel bearing.
- Install (4) small counter sunken screws, tighten these so they just touch the disk, the disk must remain as flat as possible.
|

wimshurst-skate-wheel-mount.jpg |
| Cut the sectors:
- Decide how many sectors you are willing to cut. I’m rather lazy and opted for fewer sectors, 16 per disk. If you decide to make 24 or even 32 sectors you’ll have to make them smaller but you will be rewarded with longer sparks.
- The sectors are cut from aluminum tape. Make a template from a piece of plastic milk jug and trace each sector. Cut them individually, don’t be tempted to stack multiple layers of tape; the cut will end up ragged and will bleed charge away into the air.
- Tip: I found it easiest to use an X-acto knife and straight edge to cut the long sides and then switch to scissors for the curved ends.
|

wimshurst-sector-cutting.jpg |
| Attach the sectors:
- Lay out a circle on a piece of foam board.
- Draw radial lines to correspond with the number of sectors you’ve chosen
- Place your template centered at 6 o’clock and trace it. The large end should face out and be about ¼” from the edge of the disk.
- Set the disk on the foam board and insert push pins around the circumference so it turns in place.
- Carefully peel and stick the sector in place. It’s a good idea to make some extra sectors and practice this operation first. A length of fiberglass rod makes an excellent burnishing tool.
- Turn the disk one line to the left and repeat. Always index the line to the first sector you stuck down, this will help make the spacing as even as possible.
|

wimshurst-affix-sectors.jpg |
| Prepare the drive pulleys:
- Remove the pulleys from their cages by drilling out the rivets.
- Use the step drill to enlarge the holes to 5/16″. Drill from one side, then the other to enlarge the full depth of the hole in the pulley. Note: The use of the step drill is especially important here because of its self-centering characteristics.
- Cut (2) 7″ lengths of fiberglass rod, slightly bevel the ends with a file to prevent chip out. Be careful of the glass fibers, they can be really irritating!
- Drill the splines out of the window crack bore with a regular 5/16″ drill bit. Clamp the crank in a vise and go slowly; making sure the bit is in line with the axis.
|

wimshurst-drill-pulley.jpg |