Etching Tins with Salt Water and Electricity – Compliment to The Steampunk Bible Article
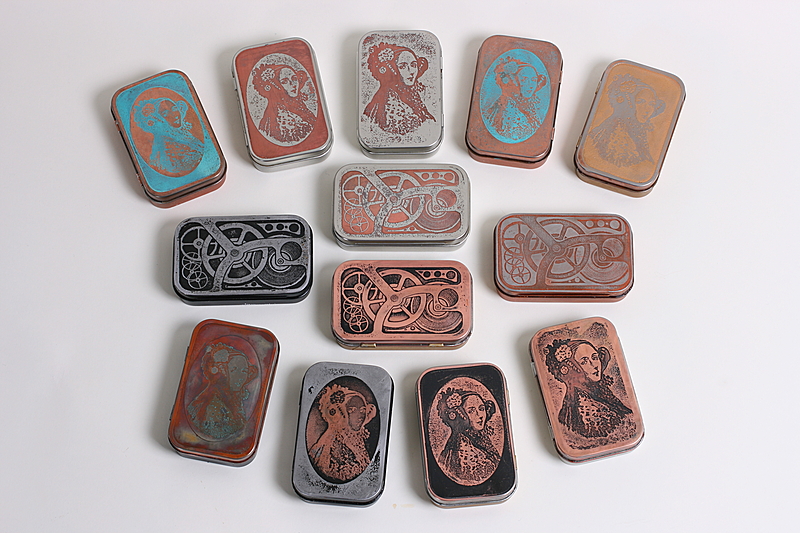
The Steampunk Bible contains an article I wrote on etching small candy tins with salt water and electricity. There was limited space in the book so we’ve provided this expanded compliment article to help you should you be interested in trying this project, enjoy!
In the past, merchants used sealed cans and boxes made from the metal tin for many products. Variable shipping methods, and the indeterminate time that a product might remain on the shelf, meant that a durable container made a great deal of sense. These “tins” of old had a certain utility after their contents had been eaten or otherwise consumed. For many products this tin-plated steel packaging is such an iconic part of their branding that they are unlikely to change to another material. Mint tins are a good example. These small tins are ideal for storing sewing supplies such as pins and needles, paper clips and push-pins on your desktop, or nuts, bolts, and other hardware in the workshop.
In this project, I’ll show you how to turn plain toffee and mint tins into beautiful boxes suitable for display. This project is about more than just decorating the surface—I’ll show you how to etch into their very substance using salt water and electricity and I’ll teach you how to chemically bond a layer of copper to their exteriors using a solution of “blue vitriol” (an archaic name for copper sulfate).
What You Will Be Doing
- Remove the paint from the tin lids, using a chemical paint stripper or heat.
- Prepare a design for etching on to the lid, using a computer and laser printer.
- Create a negative “resist mask” and apply to the tin lid using scrap magazine paper and a clothes iron.
- Etch this design into the metal using a container of salt water and an electricity source.
- Copper plate tins with a copper sulfate solution, finish them with a complementary color, and seal them with a coat of clear acrylic.
Cautions and Advice
This process requires chemicals and heat as well as electricity and water. All are potentially dangerous, so please review the following information to keep safe.
- When using any sort of chemical, you should always read and be sure you understand all of the warnings provided by the manufacturer. In some cases we will be using products in a way other than was intended by the manufacturer so the usage instructions will not always be relevant. However, always follow the manufacturer’s warnings and advice concerning toxicity and personal protection.
- You will require eye protection suitable for preventing chemicals from splashing into your eyes. Standard workshop safety glasses may or may not provide this protection, so check the literature that came with them. You will also need rubber gloves suitable for working with paint stripper, and should also wear the gloves when working with the salt water etching solution because it can irritate the skin.
- Both methods described for stripping the paint from the tins should be performed outside or in an area with plenty of ventilation.
- The actual etching process will involve electricity and salt water. Keep any connection to a wall outlet or extension cord away from your container of salt water. The etching process also produces a tiny amount of hydrogen (a harmless but flammable gas), and you should provide ventilation to prevent any accumulation.
- Avoid using older tins finished with a paint that contains lead.
- The finished tins are completely safe to touch, but you should not store food or candy in them unless you line them with a food-safe material. Do not let very young children play with them or put them in their mouths.
1 – Removing the Paint From Your Tins
Needed: candy tins, chemical stripper or a source of heat such as a hot plate or plumber’s torch, scouring pads, safety equipment
Time: an hour or two
Any of the chemical paint strippers available at your local hardware store will work fine, just follow the manufacturer’s instructions. You can also use a hot plate or plumber’s torch to burn the paint and then scrub it off with a scouring pad. Be sure to do this outside and avoid older tins that may have lead in the paint. You can also simply sand the paint off with fine sandpaper or an abrasive pad.
2 – Preparing the Mask
Needed: access to computer and laser printer, flimsy coated “Sunday circular” newsprint
Time: creative process, variable
Creating the Image
There are several ways to prepare the tin lid with an image, or “mask,” for etching. For simple shapes, cover the lid with masking tape and then cut your design through the tape with a hobby knife. For a traditional-looking etching effect don’t strip the tin—instead, scratch your image into the paint with a scribe, awl, or other pointed object, and then strip the paint off after the etching process is complete. The method being used here was originally developed by electronics hobbyists to make custom printed circuit boards. You will need access to a computer and either a black-and-white or color laser printer.
Your image or design must be black-and-white, not grayscale. For the example used here, I drew the outlines of a clock escapement in black pen and then scanned my drawing into the computer. Once I had scanned the image at a high resolution, I used a paint program to fill in all of the areas that I wanted to be completely solid. My original drawing was twice the size of the lid of the tin to make the drawing task easier. This also makes the final reduced image as sharp and clear as possible. Once you’re happy with your image, use your paint program to invert the colors and then flip it left for right so that the “mask” will print out in the orientation you desire. These functions will differ from program to program but will often be called something like “Negative” or “Invert Colors” and “Mirror” or “Flip/Rotate,” respectively. Using this option will convert your image into a mask. You will next use a clothes iron to transfer the black toner portions of this mask to the lid and the toner will prevent the solution from etching the portions of the lid that it covers.

Coated newsprint from the Sunday circulars makes an excellent transfer medium.
Printing the Mask:
You’ll need to find the right kind of paper to transfer the printer toner mask to the tin lid. I’ve found that the flimsy coated newsprint used in Sunday circulars is ideal and works as well or better then all of the other options. (This kind of the paper is coated with clay, used to make most magazine pages white and glossy, and flimsy enough so that it will disintegrate when soaked in water–and a supply is delivered free every Sunday!)
However, this kind of paper is too delicate to be run through most laser printers. You’ll first need to make a protective “sled” for it by taking a sheet of regular printer paper and folding over the top ¾-inch. Insert your flimsy paper into the printer under this flap.
3- Preparing the Lids for Etching
Needed: block of wood, clothes iron, Popsicle stick, container of warm water
Time: about an hour
Transferring the mask to the lid
Cut a piece of ¾” thick lumber to be slightly smaller than lid of your tin. This block of wood placed under the lid will help support the flexible metal while you apply the mask.
Clean the lid thoroughly with rubbing alcohol. Repeat at least twice until you have removed all traces of dirt, especially oil, that may have come from your fingers. Set the printed mask face down on the tin and heat with your iron by placing it on top of the mask for a second or two (use the iron’s highest setting). Do not move the iron sideways at all during this process!
Next, lift the iron and move it to cover the area you have yet to heat—again, without sideways movement. This process “sets” the image, partially melting the toner from the laser printer onto the tin. To complete the transfer, cover the whole lid with the iron and begin to slide the iron to one side. Follow behind the iron closely with a Popsicle stick, rubbing in a circular fashion so that you cover every millimeter of the top of the lid. Doing so will ensure that the toner is completely fused to the metal. Repeat this process on all areas of the tin for about two minutes.
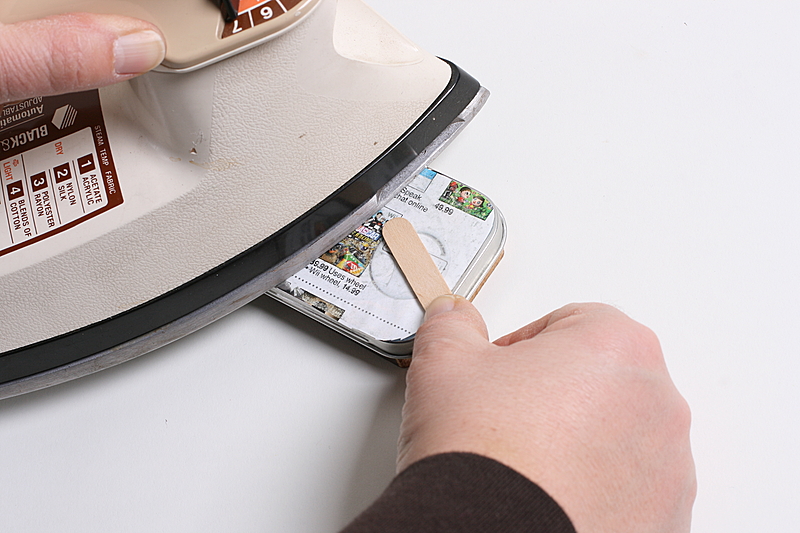
Smooth the transfer with a popsicle stick while applying heat

Soften the paper backing by submerging in water and then
remove the paper backing by rubbing with your thumbs.
Once you have gone over the entire tin with the Popsicle stick several times, drop the tin into some warm water and wait about ten minutes for the paper to soften.
After the paper has softened, pick up the tin in both hands and rub it gently with your thumbs to remove the paper, leaving the toner adhered to the tin. As you remove the backing, rub progressively harder to remove bits of paper on fine and dense features of your image. Don’t be afraid to rub hard. If toner comes off, it was toner that would have come off anyway during the etching process. Once all of the backing paper is off, set the tin aside and prepare the etching equipment. The spots where the toner rubbed off can be repaired with small dabs of model paint prior to etching.
4 – The Etching Process
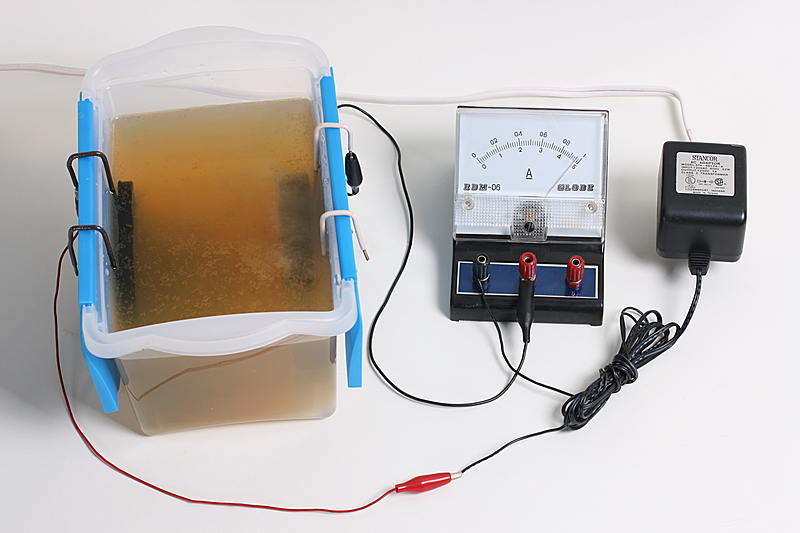
Needed: 3 quart plastic container, water, salt, DC power supply, solid copper wire or coat hanger, black electrical tape, duct tape, scouring pads
Time: 3-4 hours

Supplies, Including Electricity
For the next part of the process, you will need a three quart plastic container, table salt, some solid copper wire or a coat hanger to fabricate supports, electrical tape, and duct tape to secure the tin lid while etching it.
Most importantly, you will also need a source of electricity. The most convenient source will be a “wall wart” transformer or power supply from a piece of discarded electronic equipment.
Power supplies have three main characteristics: voltage, amperage, and whether they provide Direct Current or Alternating Current. Examine the label on your power supply for its rating. An ideal supply would read “12 VDC/1 Amp” or something similar—literally anything that produces Direct Current will do. However, a supply that reads “9 VAC/1 Amp,” for example, would not be acceptable because it produces Alternating Current. The higher the rating the faster the etch, but avoid anything over 24 volts. The supply used in this example will deliver 12 volts of Direct Current at 1 ampere, which is perfect for our needs.
Once you’ve selected your power supply, cut the connector off of the end of the wire and strip the ends so you can connect them later. In general, the positive wire will have a stripe or rib or some other marking, but don’t worry if it doesn’t. As you’ll see, there is an easy way to tell if you inadvertently reverse the connections.
Science! – How Salt, Water, and Ions Work During the Etching Process
Pure water is a poor conductor of electricity and since electricity will do the real work of removing metal from the lid, we will need to add something to the water to provide free ions. Ions are simply atoms of an element that have either more or fewer electrons than normal and can therefore carry a charge. Many compounds can provide the ions necessary, but plain old table salt (also known as Sodium Chloride) is the most readily available and works rather well.
This process is called electrolysis and it is when the magic happens! When you place electrodes into the salt water solution and apply electricity, Chloride ions move towards the positive electrode and the positively charged Sodium ions move towards the negative electrode. The reaction of these ions with the electrodes causes metal to be transferred from the positive side (the tin lid) into the solution, etching away its surface.
Preparing the Tin
Begin by bending the wire or coat hanger into a double hook. You will use these hooks to hang the tin lid over the edge of the container. The tin lid needs to be suspended below the surface of the water and parallel to the opposite side of the container. Use duct tape to secure the wire to the lid as shown.
Do the same for your tin bottom, and hang it on the far side of the container.
Prepare the lid for etching by tightly wrapping vinyl electrical tape around the perimeter of the lid. Because of the stamping process used to make most lids, the metal at the corner of a lid is very thin. The etching process can eat straight through these corners. Protecting the corners with tape solves this potential problem.

Lid support made from solid copper wire or coat hanger wire.

Masking the edges with electrical tape to prevent etching through.
The water will turn brown and then black as you etch the tins.
Hydrogen bubbles rise from the negative side or “cathode.”
Submerge both the tin bottom and the lid to be etched into the container and attach the power supply, simply twist the bare wires to the supports or use alligator clips if you have them. Connect the positive lead to the lid and the negative lead to the base and once these connections are made, plug the supply in to the wall. If you have an Ammeter (a device to measure current), attach it and begin to stir in salt until your ammeter reads slightly less then the rating of your power supply. In my example, I am using a 12 volt 1 amp supply and my 3 quart solution required 1 level teaspoon of salt to draw 800 milliamps or 8/10th of an amp. Remember to keep all connections to the wall or extension cord well away from the container of salt water.
If you don’t have an ammeter, a good rule of thumb is to add ¼ of a level teaspoon of salt per quart of water; this should work well for the vast majority of common power supplies. Check the temperature of the power supply during the etching process. If it seems to be getting too hot, disconnect the power supply, dump out the salt-water and start again this time using a smaller amount of salt.
As soon as you apply the electricity to the solution, bubbles will start to rise from the base (the negative side) and the water will turn a rust brown color. If the majority of bubbles are coming from the tin lid, you have the leads reversed! These bubbles are composed of hydrogen. Although this project only produces a tiny amount of hydrogen, please remember that it is a flammable gas.
Monitor the Process
Continually check your tin lid, turning off the power and removing it from the solution every few minutes to observe the progression of the etching by feeling it with your finger. The time needed to etch your tin is variable, and decreases with any increase in the solution‘s temperature. You should expect to ruin the first couple of pieces until you get a feel for the process!
Checking Your Lid
The etched surfaces of a finished piece will be slightly rough, with a gray appearance. You may find a few pin holes and lifted areas on the mask. More often then not, these “imperfections” add beauty and texture to the finished piece.
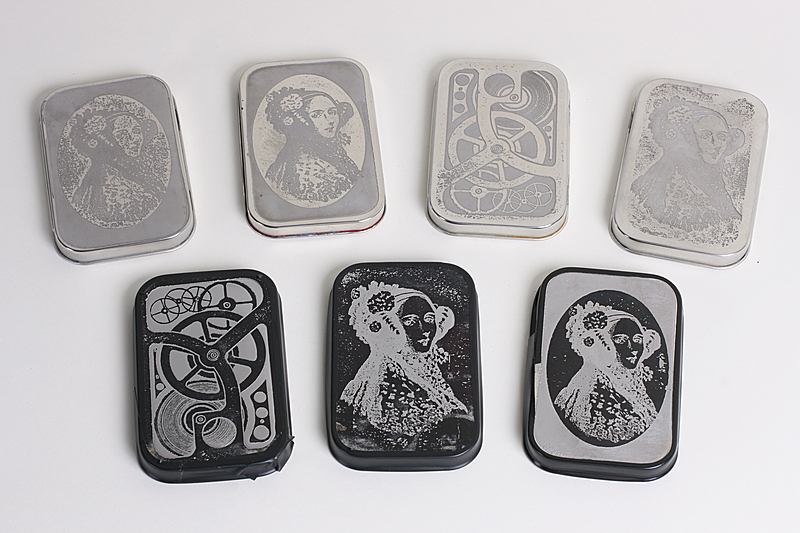
Scrub off the printer toner with a little paint stripper, solvent, or elbow grease and scouring pads.
Removing Toner
A touch of paint stripper or solvent on a piece of steel wool will remove all of the toner from your etched pieces and leave them ready for the next step. Scouring soap pads and water will also remove the toner, although with somewhat more effort. You may want to leave the toner mask on some of the tins until after you copper plate them. Doing this results in a silver and copper effect that is quite striking.
5 – Finishing Your Tin
Needed: copper sulfate, cotton swabs, a weak acid such as vinegar or Muriatic acid, steel wool, safety equipment
Time: 3-4 hours
Using a Copper Finish
You can finish your tin in dozens of ways, and any craft store should have shelves of specialty finishes. However, I do have a favorite method that adds a coppery appearance to my etched tins. Copper sulfate is the magic ingredient in this type of finish, commonly found in “Root Kill” products. People pour these products down their drains once or twice a year to kill tree roots that may have infiltrated sewer pipes. Check the bottles of root killer in your hardware store. If they read “99% copper sulfate pentahydrate,” you’ve got the right product. Read and follow the safety recommendations on the bottle, including the use of protective eyewear.
Preparing and Using a Copper Sulfate Solution
To prepare the copper sulfate solution, mix 2 heaping tablespoons of copper sulfate crystals into 1 cup of warm water in a jar or other closable container. It is never a good idea to store chemicals in unlabeled containers. Mark the container “POISION – Copper Sulfate” because this jar will last you for quite some time. Stir until most of the crystals are dissolved but don’t worry if you see a few left at the bottom of the jar.
Give your piece a light buffing with some steel wool. Then, in a circular rubbing motion, apply the copper sulfate solution with a cotton swab.
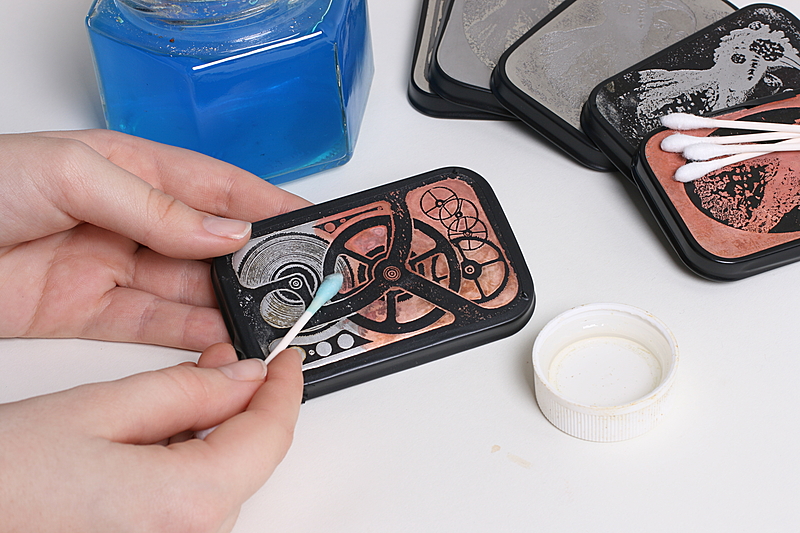
Applying the copper sulfate finish.
Solving Potential Problems
As you progress, you may notice spots where you cannot get the copper to stick to the steel and tin. Try treating these areas with a small amount of white vinegar or dilute muriatic acid (available at your hardware store or home center).
You’ll notice that the coating formed by the reaction of the copper sulfate solution and the tin will be quite variable. Some people find this frustrating, but you can easily experiment with the textures and hues. It usually yields wonderful results!
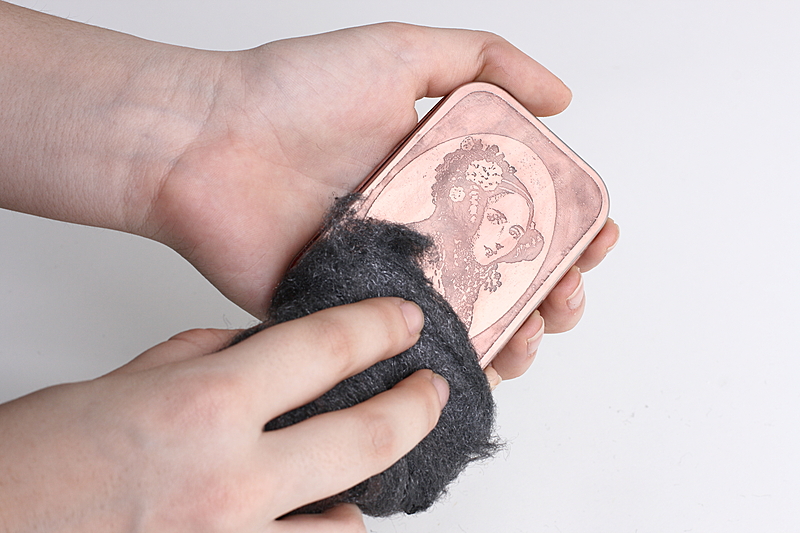
Polish by lightly buffing with steel wool.
Drying and Buffing Your Tin Lid
When your piece looks the way you’d like it to, set it aside to dry for an hour or so. Then you can shine it by buffing it very lightly with steel wool.
Completing the Finish
To complete the finish of the pieces, I like to fill in the etched area with some paint of a complementary color, or a patina compound such as Rub-and-Buff™ Patina. You can apply either of these with your finger, let them partially dry, and then buff the excess off of the high spots to bring out your image. Experiment and have fun! One of the delights of this process is that no two tins will ever come out exactly the same no matter how hard you try!
Hi Jake, thanks for the awesome tutorial and the site – I’ve enjoyed perusing it and seeing your various projects. I have followed your etching process and had brilliant results right from the start. Love it!
The copper plating, on the other hand, has not gone as well. When I touch the qtip to the tin the tip immediately turns black and what looks like a black suspension “mixes in” with the copper color and makes the patina come out anywhere from Nightwatch black (pre-restoration) to just dirty looking.
Do you have any advice? Is it surface contamination perhaps? I am cleaning with a scouring pad, then dish detergent, then vinegar and then rubbing alcohol before proceding to copper application.
Thanks!
I tried again this afternoon, and was able to get some success. This time I used a bronze (?) piezo disc that I had from a pack of 10. I was able to transfer a somewhat faint image of the letter “B” to the disc. When I applied the electrolyte, it gave an image. I don’t have any copper sulfate, so I can’t really finish the project. I just wanted to let you and your readers know that your process does work.
1) I tried all afternoon to get an image by using my laser printer without any success. I tried several different kinds of newspaper inserts including a glossy one. That one gave nothing at all. I suspect that the laser toner brand has something to do with it as well. I used a brand-new generic toner cartridge with an HP 1102w laser printer. Maybe genuine HP cartridges work better. BTW, I used my grinder wire brush to clean the metal, and then washed it meticulously with rubbing alcohol to make it very shiny and clean. All to no avail. At one point, I had a very faint image and was hopeful, but ultimately, it didn’t work. I sure do envy your etches. They are very good.
2) I have been using fingernail polish as a mask, but that is so sloppy–(I’m so sloppy)–that the outcome was very poor. But, it does work. It just doesn’t do nice designs like a printer does. I used a mask that I cut out painfully with a penknife. Maybe using a mask cut from electrical tape would keep the fingernail polish from slipping underneath, I’m not sure. Not tried yet.
3) Also, I had a DC etcher and AC marker made out of a wall charger for a different project, but the DC doesn’t have enough juice to do much of anything. (I didn’t wait for the requisite number of hours, I guess.) The AC side of it works very well as a marker. One of your readers suggested using an auto battery charger–2 amps at 12 volts. Whoa! That works!!! In seconds.
I’ve used sharpie marker and it works as a great resist. You can clean it off with light scrubbing in the end. Enjoyed the tutorial.