Cheap Yaris Cabin Air Filter
Every time I've brought my Toyota Yaris in for it's regular service I was surprised to find a $50 charge for replacing the "cabin air" filter. It always annoyed me, but they assured me it was a pain to change the "special" filter.
Turns out that's bullshit. It's a cheap paper filter that takes about 30 seconds to replace. Corporations use proprietary parts and slip through overcharges for simple maintenance to add to their profit, of course. But this is an ultimately dis-honest practice that risks making otherwise satisfied customers, like me, angry and desirous of revenge for being duped.
Well here's my revenge Toyota, a step by step set of directions on how to turn a $5 household furnace filter into two Yaris cabin air filters. It took me an hour and a half to figure this out and make two filters and another half hour to write this page. Someone following these direction should be able to make a pair of filters in an hour, saving them (and denying you) $100!
The filter is accessed by pressing in on the sides of the open glove box, which then swings down out of the way revealing the filter door that opens with a squeeze on it's retaining clip.
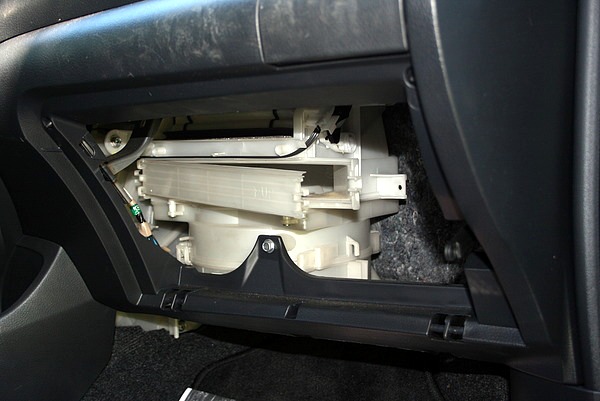
The filter just slid out at that point. Here's a picture of mine, do you notice anything odd about it? Yeah, it was jammed in 90 degree to the direction it was supposed to be installed and then crushed by the filter door closing. Not only was I charged $50 to have a $1 filter replaced, the "technician" was not even competent to do the job.
.JPG)
Off to the home center to find a likely candidate for replacement material. I looked for something with pleats that were about the same width as the ones in my filter. I found this furnace filter for just under five bucks, it's large enough so that I can harvest sufficient material for two Yaris filters.
It also has a picture of the space shuttle on it! The company apparently makes filters for the shuttle, which is extra cool because I used to work for a company called Airflow Research & Manufacturing that made the fan that circulates air in the shuttle through it's cabin air filter. The shuttle has a big filter between decks that is treated to be sticky so that it traps all of the little floating bits of dead skin, dried spittle, and lint that would otherwise be circulating around the cabin.
.JPG)
The Yaris filter is 8 3/8" x 7 1/2" so I laid out two 7 1/4" wide stripes so there would be room for the two 1/8" wide pieces of cardboard I planned to use for the ends.
.JPG)
The Yaris filter has 16 pleats but the furnace filter's pleats are slightly narrower so I trimmed the strips at the 20 pleat mark so that their surface area would be about the same.
.JPG)
Here's a close-up of the Yaris filter's construction.
.JPG)
.JPG)
I made a jig from scrap wood to hold the filter in place while I glued it together, the polyethylene sheet is to ensure I'll be able to lift the filter off even if some glue seeps through.
.JPG)
I placed the filter in the jig and put the two strips of cardboard in place, these are cut to be the same size as the felt pieces on the original Yaris filter.
.JPG)
I added an additional shim of cardboard to compress the filter material and make a good seal for gluing.
.JPG)
I glued the first with a hot glue gun.
.JPG)
.JPG)
Just in case the hot glue doesn't hold up in the hot car, I glued the second one together with carpenter's glue.
.JPG)
The new filter is in place and seems to perform well! Next I'll investigate some of the washable filters available to see if I can eliminate the need to buy disposable paper filter material.
.JPG)
Oh! BTW: if you are trying to fix a musty smell in your Toyota Yaris, this page I wrote about cleaning the condensate drain might help you.