Mini Dremel Table Saw for Cutting Solar Cells
I’ve been making solar powered lanterns to hang in the tress on our property. I just love the idea of capturing light during the day with solar cells and batteries and then releasing it at night to create a fairy tale ambiance. Unfortunaeately most of the commercial solar powered lights are weak and short lived.
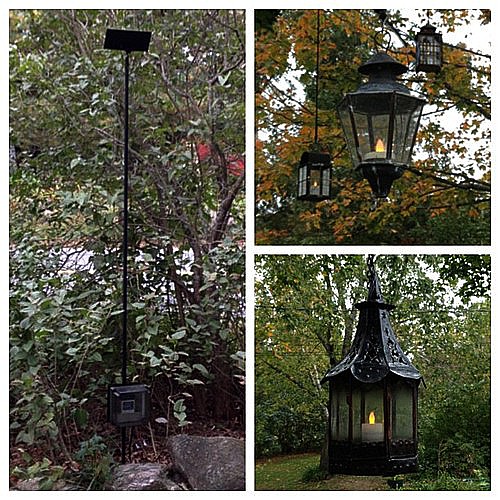
The main issue seems to be tiny solar cells and very low power LEDs. So I ordered a bunch of super bright LED candles
and wired them into a half-dozen lanterns that I found at our town dump. The lanterns where hung from our trees with telephone wire (the kind that goes from the pole to your house) and the wires connected to a weather proof box containing a battery and a solar cell on a pole.
The solar panel was a 9 volt array of solar cells encased in resin on a piece of G-10 that I found in a dumpster a few years back. It worked quite well and easily kept the 5 super-bright flicker LEDs lit. I have one more panel but I have plans for many, many more LED lighting projects so I went looking on eBay for cheap solar cells.
.JPG)
It turns out that you can buy broken 3″ x 6″ (actually more like 80mm x 150mm) solar cells for about $30 for 100. These can then be cut into quarters to yield the right size cells for small 9 and 18 volt panels (the voltages you need for charging 6 and 12 volt batteries, respectively. These cells are paper thin silicon and the easiest way I found to cut them was with a diamond wheel on a Dremel tool.
.JPG)
So I built myself a little Dremel powered table saw and “sled.” The sled has marking for 40, 80, 75, & 150 mm so the cells can be easily aligned and quartered.
.JPG)
I used a Dremel right-angel drive and 1.5″ diamond wheel. A 1/16″ spacer under the head of the right angle drive got it to lay flat and true against the top plate of the saw and a block of wood glued and screwed into the side held the tool in place. I used a 2″ hole saw to make a place for the Dremel tool itself to mount and held it in place with a screw-eye and a zip tie.
The diamond wheel sat at a slight angle after I tightened the tie wrap down so I drove a screw in from the outside to nudge it straight.
.JPG)
The sled was built with aluminum pieces, polycarbonate (part of an old laptop backlight panel) and double -sticky tape and then run through the saw to make the slot.
.JPG)
I put foam rubber gaskets around the base, when the vacuum is running it collects the dust, pulls cool air through the Dremel, and sucks to whole saw firmly down to the work bench.
I’m still playing with technique and blade height but the saw does a pretty good job of cutting these paper-thin sheets of silicon. Once cut I gently clean up the edge with 400 grit paper and test the cell with a meter for shorts and to make sure it is producing the .5 volts it should.
.JPG)