How to Build a Wimshurst Influence Machine – Operating the Machine
This is the final part in a series of articles describing how to build a Wimshurst Influence Machine with parts and materials available at your local home center and hardware store. In this part I detail setting the machine up and making some sparks! If you missed the beginning of the series start here. This article was originally published in Make: Magazine volume #17.

Operation:
A note of caution first: while this machine is unlikely to produce sufficient charge to injure a healthy individual directly, it can and will produce enough of a jolt to knock you off your feet and who knows what your head might hit on the way down. Respect it!
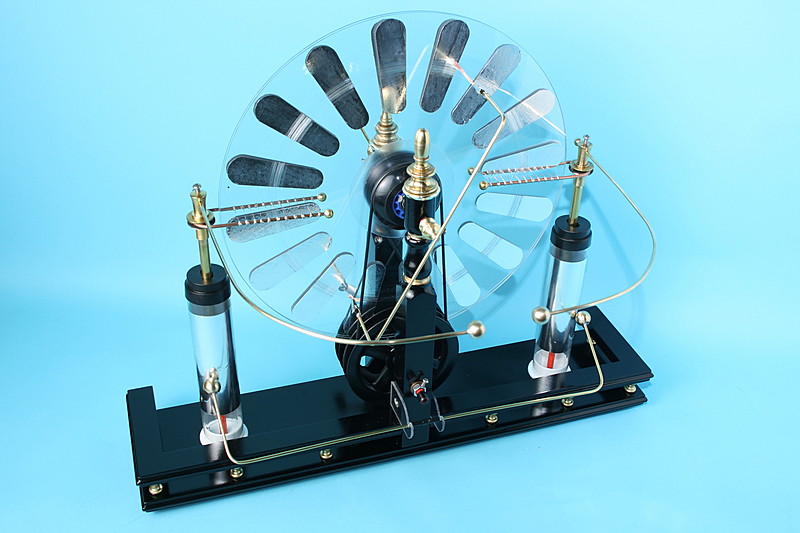
There are three variables that you can play with to vary performance. The size of the spark gap can be adjusted, the angle of the neutralizing bar can be varied, and the Leyden jars can be switched in and out of circuit with the shunt. Start with the spark gap set to about an inch, the neutralizers at 45 degrees to the collector combs (90 degrees to each other) and the Leyden jars disconnected.
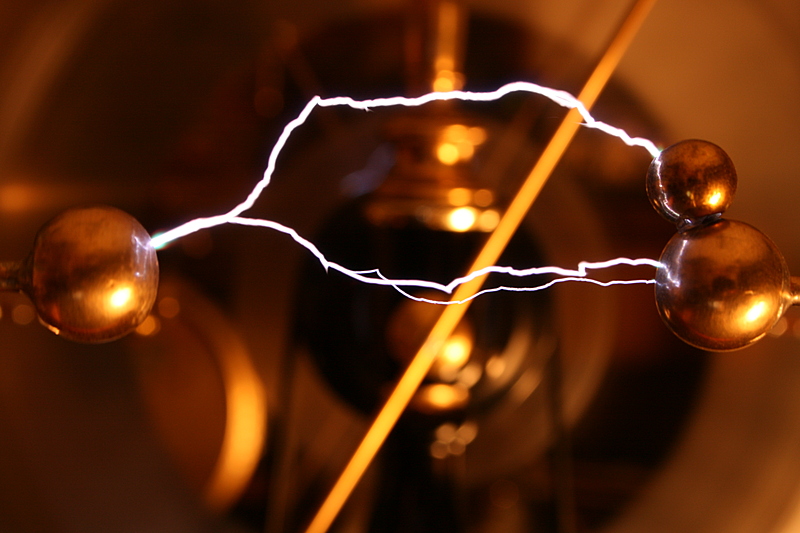
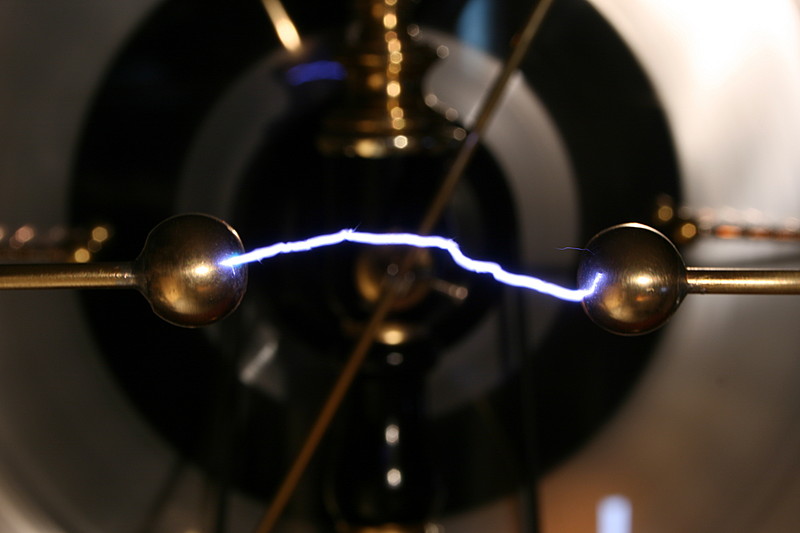
Now start to turn the crank smoothly and at a moderate speed. With this configuration the machine should show a thin blue spark. Look closely at the spark and you'll notice that one end of it is brighter, this it your positive electrode.
Stop cranking and engage the Leyden jars. Be warned, the Leyden jars can hold a charge for hours or even days. From this point on you should consider the machine "hot" and liable to bite unless you short the electrodes. Also be warned that Leyden jars can acquire charge just sitting there so you need to discharge them each and every time before you touch the electrodes. Turn the crank again, seemingly nothing will happen for several revolutions. Then you'll hear the neutralizing brushes start to crackle, you'll smell the fresh scent of ozone, then finally CRACK! a strong blue spark will jump the gap.

Take a screwdriver and short the electrodes together and then reposition them a little further apart. Crank some more and you'll see a bigger spark. Repeat this procedure and eventually something different will happen. You'll see multiple small sparks jump from one of the collectors, across several sectors, and to a neutralizing brush. When you see this, you've reached the maximum spark length your machine is capable of.
The maximum spark length of your machine is slightly larger then the sum of the sector spaces between the neutralizing brush and the closest collector. Slightly larger because it harder for the spark to jump multiple gaps verses a single gap due to the charge distribution on the sectors. This is why a larger number of smaller sectors will result in a high voltage and thus a longer spark.
Some small adjustment can be made to the neutralizing bars at this point. Setting the bars at about 60 degrees to each other will increase the maximum voltage at the expense of a small decrease in current.
Finally, there's one trick that can be very helpful if you want to take photographs of your machine in operation or just need two hands free for your experiments. Simply remove the windows crank from the drive axle by loosening the set screw and clamp an adjustable speed drill directly to the 5/16" shaft. Increase and decrease speed slowly to avoid belt slippage. Depending on the balance of your disks you should be able to spin the machine quite quickly. Note that spinning the machine fast does not increase spark length, only decreases the charge time between discharges.
Attaching a small ball to the positive electrode will result in larger and more interesting sparks.
The small ball creates a plume of ionized air that helps the spark jump the gap.
Your machine should require little maintenance over time, but may require periodic replacement of the belts and cleaning of the disks. Use only water to clean the disk as contaminates will cause charge to bleed away. If you suspect the there is some oil on the disks, gently wipe them with rubbing alcohol and be sure to remove any film left behind.
I really enjoy playing with this machine I've built; it's a constant source of entertainment! However, I am beginning to experience something that I was warned about by other Wimshurst builders. I want to make bigger and bigger sparks and it occurs to me that I could cut two 48" disks from a single 4 by 8 foot sheet of polycarbonate . . .
For further reading on the subject I would suggest:
Ford, R. A. Homemade Lightning: Creative Experiments in Electricity, McGraw-Hill/TAB Electronics, 2001
Francis, G. W. Electrostatic Experiments: An Encyclopedia of Early Electrostatic Experiments, Demonstrations, Devices, and Apparatus, Electret Scientific Company, 2005
sir can you tell me how much voltage is developed by the WIMSHURST MACHINE you have made?