Home

Main Menu

  • Projects
  • Fashion
  • Music
  • Books & Reviews
  • Events
  • Features
  • Upcycling
  • Videos
  • Steampunk Labs Project
  • Kerosene Lamp Project
  • Technical Resource Links
  • Steampunk Links
  • Ephemera
  • Site Search

Thoughts on a DIY Electro-Chemical CNC Machine Tool

Jake von Slatt — Thu, 02/01/2007 - 06:18

motors and parts salvaged from HP inkjet printermotors and hardware salvaged from a xerox copier

There is a class of machine tool know as CNC, or Computer Numerically Controlled.  These are computer controlled tools capable of cutting complex shapes with a high degree of accuracy and repeatability.  They generally cost tens of thousand of dollars and weigh over a ton.  They're often available used for a few thousand dollars and I'd consider purchasing one for the workshop if I had the room for it.

There are also a large number of hobbyist kits for making small table top units with cutters based on Dremel tools and wood-working routers and there is an active community of people designing and building DIY machines, see Lab Links for resources.

I want to leverage these resources to build a CNC Electro-Chemical Machine tool.  It will consist of a gantry that can move in 3 dimensions and hold a variety of "cutting" tools.  Another key component is a electrolyte pumping and filtering system to prevent material build-up on the cathode "cutter".

Another type of tool, the Electrical Discharge Machine tool, is physically very similar to an ECM tool.  However, with the EDM a high current discharge is used to melt tiny bits of material and the resultant collapsing vapor pocket in the fluid then blasts the molten metal from it's pit.  A circulation and filter system is also required,  but a dielectric fluid is used rather then an electrolyte.  

Both of these machines have the advantage that the cutting electrode or "tool" does not actually touch the work and thus, there is no side loading.  This means that the machine tool does not require a huge chunk of cast iron to keep it rigid and repeatable.  I plan to construct my machine with inter-changeable components so that I can experiment with both EDM and ECM modes.

I'll use  LinuxCNC.org's EMC2 software to control the operation of the machine.  EMC2 supports a variety of drivers, both stepper and servo, and appears to be the most popular of the OpenSource CNC projects.

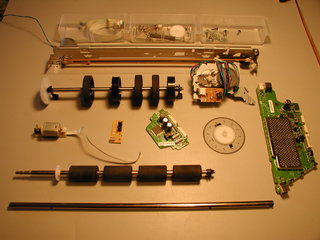
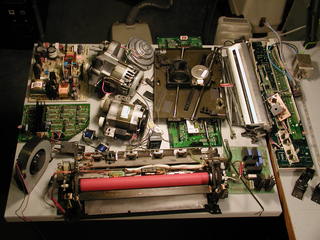
First steps are playing with EMC2 and collecting hardware.  I stripped an old Xerox copier and an HP inkjet printer this past weekend and, though they yielded many nice parts,  none of the motors are approriate for this project.  Suprisingly, the HP Inkject printer used servo motors with encoder wheels, I had expected it to use steppers.  The Xerox copier, on the other hand, used simple AC motors and had no steppers either.  It's not a total loss as the HP servos will work fine as models for testing servo control electronics if I choose that motor technology.


  • Fabbing
  • Ideas
  • Jake von Slatt
  • Labs Projects
  • Planning
  • Login or register to post comments

Interests

cyber.shifter — Wed, 09/02/2009 - 20:54

I just found this site and I have to say, I really like it. I've always been a steampunk fan, but I'm a tinkerer first. This project really interests me. Do you plan on using a microcontroller to control it and interface to the computer? I'm just curious.

  • Login or register to post comments

Stepping motors and registration marks

george- — Wed, 05/28/2008 - 16:40

Dear Jake,
I get a lot of my stuff from school auctions, and have determined that there are a lot of good stepping motors in Scanners wether apple or other brand, also the plate glass in them is great for some of your other projects, I use them for glass photographic plates among other things. I just found your site and am enthralled by some of the ideas (i.e. this means i shall actually try them out )
As to registering the sides of your etch-machinings in the printing industry we use what is/are called registration marks to line the color plates up as they are found in the CMYK settings usually ( sorry I'm not to familar with GIMP I use various intenerations of Photoshop, Canvas, Etc) you should put some on all four corners of the etching plate about 5mm or 1/4 in from the sides at the corners. I hope these ideas help
George Stumpf
btw I was trained a a journeyman machine builder handworker craftsman in germany many years ago

  • Login or register to post comments

Search

Projects

Keyboard

LCD Monitor

Light Switch Plates

Wimshurst Machine

MAC Mini Mod

Altoids Tin Etching

Lightbox

Guitar Amp

Lyra's Lamp

Shop Respirator

Etching Brass

Flash Diffuser

Bus Conversion

All-in-One PC

Motorbike

Etch Machining

iPod Etch

Headphone Mod

Steampunk Strat

Telegraph Build

Steampunk Car

Trilobite Etch

Kerosene Lamps

Trailer

Community

  • Twitter:  Jake |  Meredith
  • More projects: www.vonslatt.com
  • Jake is on:  LiveJournal & Facebook
  • Jake's Shared Google Reader Items
  • Email Jake: jake@vonslatt.com
  • Email Meredith: satiredun@gmail.com
Creative Commons License
Designs by Jake von Slatt on this site are licensed under a Creative Commons Attribution, Noncommercial, Share Alike 3.0 United States License.
Permissions beyond the scope of this license may be available here.
 
Subscribe to our Announcement List:

Your email will never be divulged and we will only make an announcement when there is a genuinely interesting new thing.

Login

What is OpenID?
  • Log in using OpenID
  • Cancel OpenID login
  • Create new account
  • Request new password

Subscribe

Subscribe to our Announcement List:

Your email will never be divulged and we will only make an announcement when there is a genuinely interesting new thing.