Prusa Mendel Mods
Note: I'm trying something new here, I recorded the video and then submitted it to Amazon Mechanical Turk for transcription below. I've only done a small amount of editing to the text and added a few still shots.
Hi Jake Von Slatt here. I want to show you some of the recent modifications I have made to the rep rap Prusa Mendel 3D printer that I built. This was a pretty typical Prusa Mendel build. I used stainless Steel threaded rod and stainless Steel hardware which increased the cost a little bit but everything else was pretty much standard. I do like the stainless steel threaded rod it seems to have a nice smooth surface finish and everything moves smoothly.
.JPG)
One of the first things that I printed were the spool holders. They are printed with PLA and they take up nearly the whole bed width. That was where I learned about the importance of getting the bed leveled just right. I used the classic spring method at each corner and used some Boston clips to hold a piece of glass down. The glass provides a nice flat surface but this mirror tile that I found at the dump isn’t quite flat enough. The right hand side and in the middle dips down a few thousandths of an inch and this does cause some issues with some prints. If I am printing usually in the center there is no problem. But some of the larger prints I’ve done peel up a little bit at the far right side.
I have been printing a lot with ABS and I really like the stickiness of ABS and I am finding that I am getting higher quality prints with the ABS than I was with the PLA. The components of my printer are all printed with PLA. I bought them on eBay last year. What I found is if I did a lot of printing with ABS on a printer made of PLA the heat soak of the extruder began to melt the x-carriage.
.JPG)
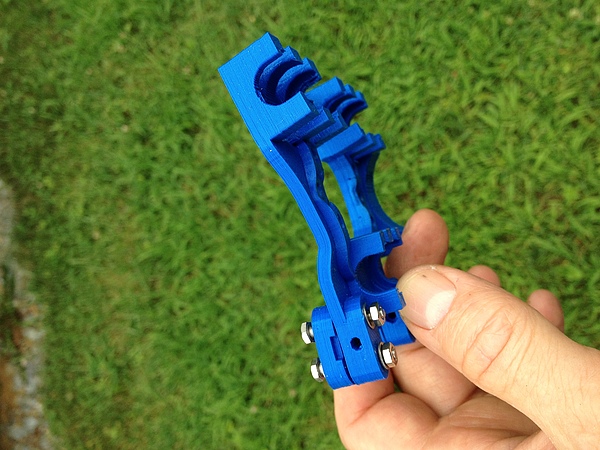
So one of the key modifications that I've made to the printer is that I used some of the y carriage bearing mounts and a piece of aluminum and a custom milled aluminum bracket to retain the extruder. This has been working quite well for me. I recently had the extruder clogged to the point where I couldn’t clear it on the machine so I am in the process of taking that apart and clearing that up.
.JPG)
The other modification that I have made to the printer compared to the set of parts that I originally purchased on eBay was the buy a Greg's Wade's accessible extruder drive. This makes changing filament and repairing or cleaning easier. Sometimes what happens is that the filament gets jammed and the hobbed bolt gets loaded up with plastic and you have to open it all up and scrap the plastic out of the hobbed bolt teeth with a sharp object and this makes that process a lot easier. It also makes attempting to clean clogs a lot easier. Sometime you can heat it up and pull whatever gunk is in there out through the top. This doesn’t always work but it is always worth trying before you disassemble and clean the whole thing.
.JPG)
The other modification that I think is critical is the Z axis micro-adjustable end-stop. This was a fairly simple part that I found on thingaverse and printed out and put my optical stop on it with the springs and the knobs and this makes adjusting Z much easier. I just set it with a piece of paper and usually it takes one or two iterations and hits of the Z home button and sliding the paper in and out. You basically want a loose fit with a standard piece of paper for ABS on the heated mirror. I found with the PLA I wanted tighter clearance there. You want the PLA to smush down against the glass.
.JPG)
The next mod is this marble base. I think it’s a stone for kneading dough in the kitchen. It’s just a marble plate about 2 feet by 18 inches and the machine is attached to it with double sticky tape and this holds everything absolutely square. The frame is a little bit flexible as it is and by attaching it to the marble plate it provides a very solid base. Things do not change I can move the printer without having to re-level the bed and it adds mass to the whole thing and it makes it more repeatable. It is a simple mod but one that makes a better print.
.JPG)
Finally, a fan on the Arduino controller board is really important. The heat sinks are quite small and blowing air directly on them improves the performance of the machine. This is a full size muffin fan that I am running at 5 volts so it is nice and quiet. It seems to do the job very well. In general, I have been very happy with the Prusa Mendel design this is version 2. Though I think the next version that I build I think I am going to do the iteration 3 which is the one with the aluminum panel which supports the x-axis. It has some rigidity improvement and I do have a CNC milling machine so it’s going to be trivial for me to make those parts.
This is Jake von Slatt. Thank you very much. See you next time!