Jake’s Wimshurst Machine and How to Build It! (Part 1)
 Last year I wrote an article for Make Magazine volume #17 that described the construction of an electrostatic generator of electricity, a Wimshurst Influence machine, using parts and materials commonly available at your local home center and hardware store.
I was a little surprised and quite pleased when I realized that the contract from O'Reilly Media (the publishers of Make:) had me retaining copyright for the material I submitted. What I sold to O'Reilly was basically a right to use and to publish first.
So here it is for your enjoyment! This is the first of a five part series detailing the construction of a Wimshurst Influence machine! (UPDATE: added large dimensioned drawing.)
Part 1 – Overview, Materials, and Tools
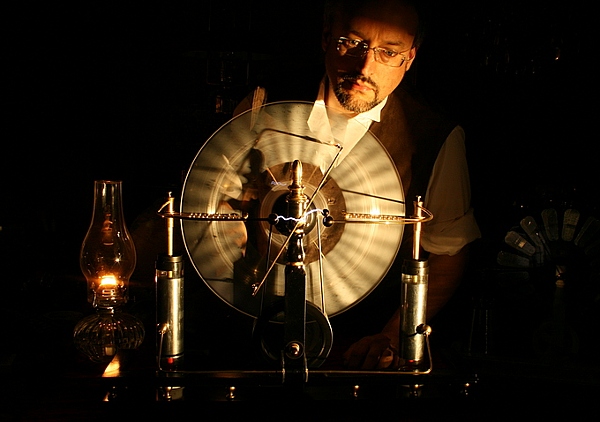
When assembling a laboratory, the gentleman or lady experimenter should be sure to include a Wimshurst electrostatic generating machine. Not only will this device serve tirelessly for investigations in the field of natural philosophy, interesting parlor games such as the electric kiss are also possible! Herein we will demonstrate the construction of such a Wimshurst machine with materials easily acquired from your local home center and hardware store.
Introduction:
Electrostatic machines have always seemed a little like magic to me. I've worked and played with electronics since I was about 6 years old, so I have a thorough understanding of induction and electromagnetism. However, electrostatics are a different thing entirely. These machines that create high voltage charges don't have the familiar coils of copper wire, permanent magnets, and commutators of conventional generators. They are made from brass, glass, and wood, and look more mechanical then electrical. But the coolest thing about electrostatic machines is that you can feel them working. As you begin to crank a Wimshurst machine you will hear it start to crackle and hiss with energy, you will smell the sharp scent of ozone produced and you'll feel the hair on your arm stand up as the Leyden jars charge.
Functional Overview:
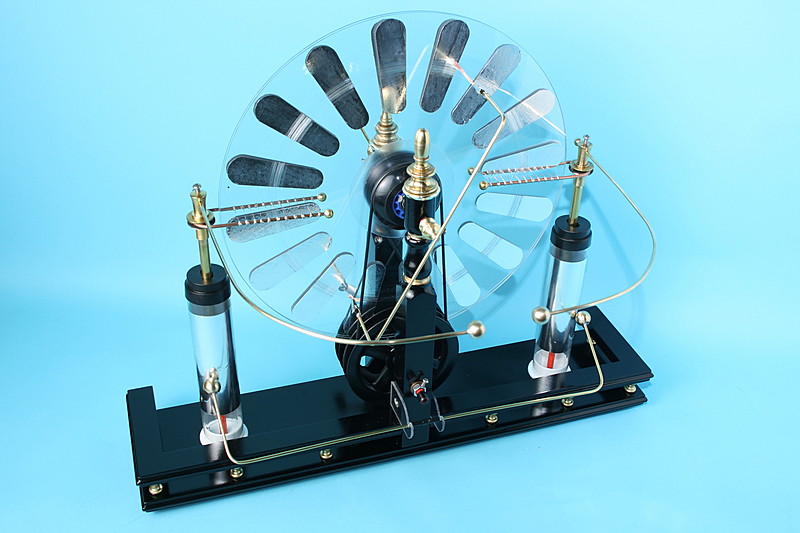
The main components of a Wimshurst Influence machine are a pair of counter rotating disks with metal strips or sectors, a pair of charge collecting combs, and a pair of neutralizing bars with conductive brushes that contact the sectors. We're all familiar with the static shocks we receive after getting up from our seat and touching a door knob when the weather is dry. That act of separating your posterior from your chair causes a charge imbalance; a Wimshurst machine is essentially an idealized series of posteriors and chairs endlessly sitting and standing with a pair of collecting comb to gather the charge produced so that something useful may be done with it.
Our machine will be built from materials readily available at your local home center and hardware store and can be assembled using common hand tools. The most complicated operations will include some soldering but you will soon discover that attaching brass balls and rods in this manner is much easier then soldering integrated circuits or working with surface mount devices. However, it will require a somewhat larger iron and perhaps a small torch.
History:
Some of the earliest examples of electrostatic generators were build in the seventeenth century and generally consisted of a rotating armature made of amber, sulfur, or glass and a cloth or brush to create friction and induce a charge. These machines had highly variable levels of performance and were quite finicky. They were very dependent on the weather and low levels of moisture in the air and would often fail to function at all on a humid day.
Around 1860 the German physicists Wilhelm Holtz and August Toepler independently developed "influence" machines that created an electrostatic charge without the necessity of having a piece of cloth or fur in direct contact with the rotating armature. These machines did, however, require an initial source from a friction device to provide the charge imbalance that would then be amplified by the rotating machine.
In 1880 James Wimshurst, an English engineer and inventor, became interested in influence machines and started building examples of the most common machines of the time in his home workshop. To these machines he added his own modifications and improvements, refining the design of the metal sectors used by some and developing a machine with two counter rotating disks rather than the single rotating disk previously used. While he never applied for patents on his work, his refinements so improved the function of these influence machines that they became popularly known by his name.
Wimshurst machines were used by scientists and experimenters investigating electrostatics but also, and more significantly, by the medical profession. Wimshurst machines with multiple sets of disks were employed to excite X-ray tubes used in early medical imaging. Smaller Wimshurst machines were also employed to apply electric shocks directly to the patient. While it is unlikely that these shock treatments actually helped the patients of the day, once you get a chance to play with your own Wimshurst machine you will surely understand how a patient might believe that the machine must be doing something!
Wimshurst machines also had a place in Victorian entertainment. After a fine meal, guests would often adjourn to the parlor for games, discussion, and demonstrations of a scientific sort. One can imagine that the visceral aspect of the Wimshurst machine with its spinning glass disks, crackle of electrical discharge, and the loud report of the six-inch sparks generated must have made it particularly popular. And for the most adventurous, in the right sort of company, there was a demonstration known as the electric kiss.
When demonstrating the properties of electrostatics with the electric kiss, the two volunteers would stand on insulating surfaces. Each would touch one of the two charge collectors of the Wimshurst machine and then they would slowly and without any other part of their bodies touching, bring their lips together for the inevitable "tingle" of electricity.
Please note: it is recommend to demonstrate the electric kiss only with the Leyden jars taken out of circuit since leaving them in will result in quite a painful jolt. I expect the Victorian era contained its share of folks of both sadistic and masochistic bent who took delight in leaving the jars engaged!
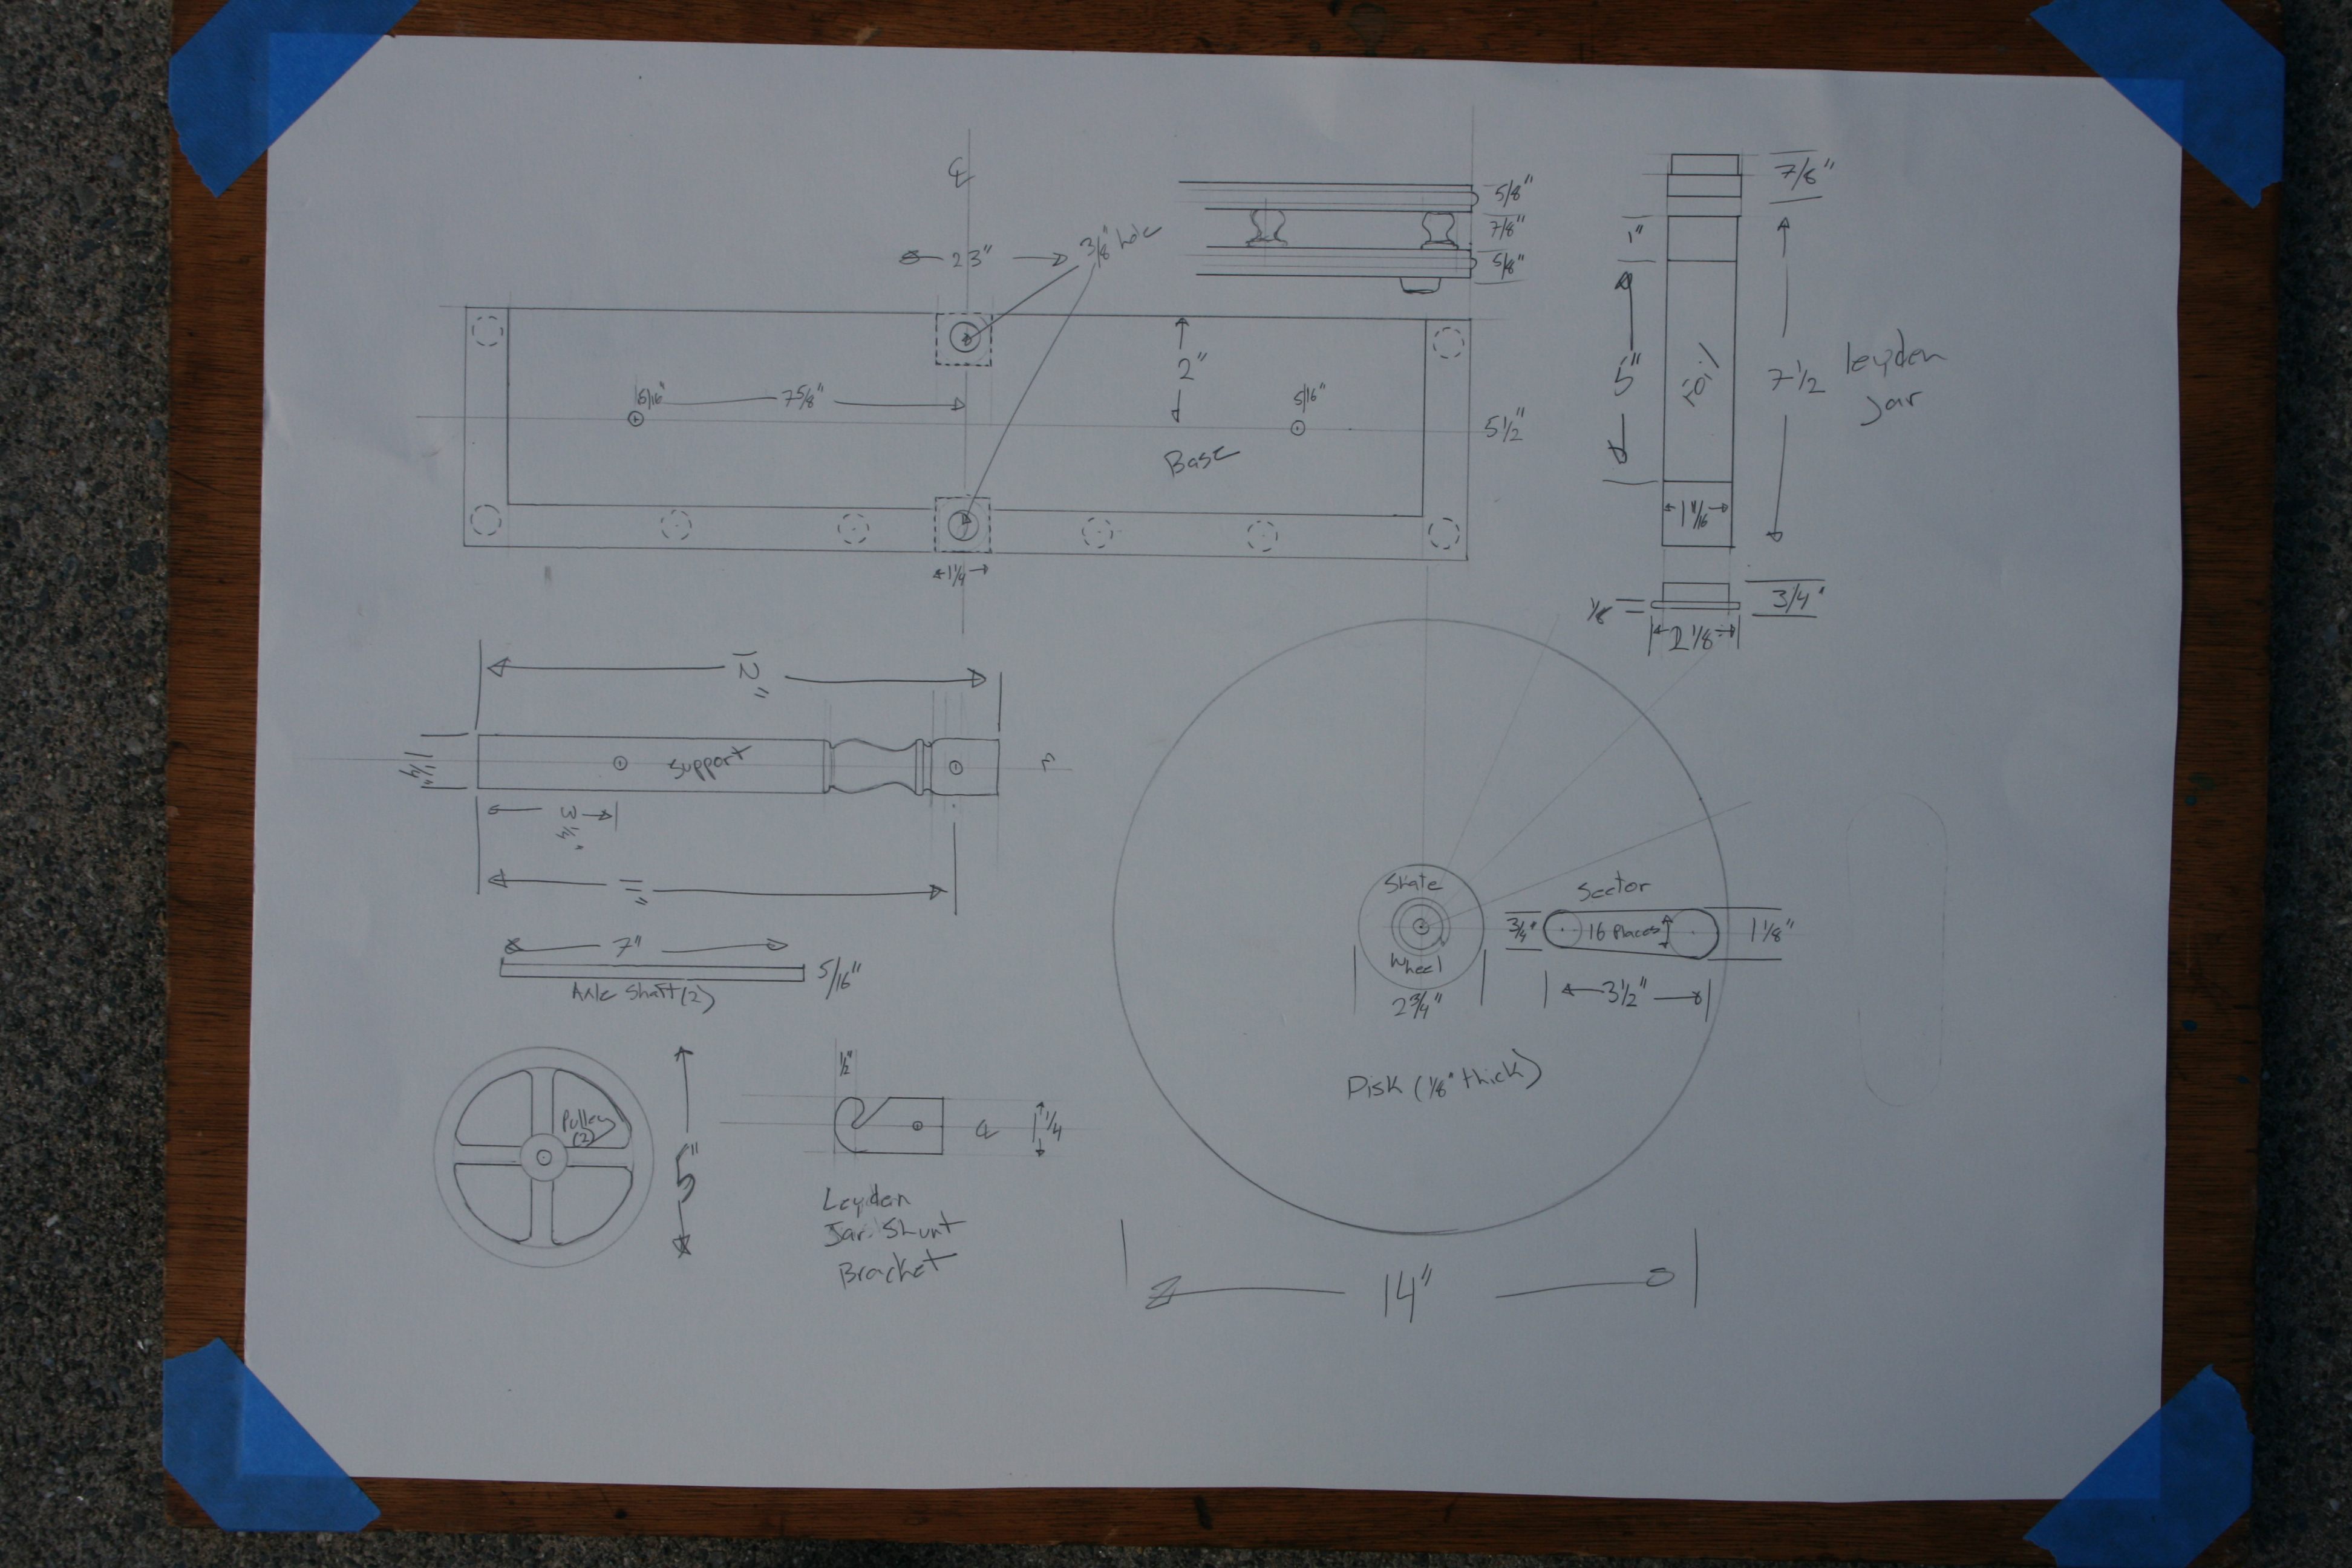
Materials:

Figure 2 wimshurst-materials-blue-bg.jpg
In developing this particular project, I was careful to source material only from my local home center and hardware stores. The one item I was not able to find locally was the pair of large O-rings that I used for the drive belts. Sources for these are provided at the end of this bill of materials. In addition, you may not be able to find the exact hardware that I've used but there are many similar components and you should have little difficulty in finding alternatives.
-
Fluorescent Lamp Protector Sleeve – used to make the two Leyden jars.
-
Staircase Balusters – these will be the supports for the rotating disks.
-
1/8" Bronze Brazing Rod – will be used to fabricate all of the conductors. If you can't find this at your local hardware store look for a welding supply shop, they are sold by the pound and are incredibly useful for many things even if you don't own an oxyacetylene torch.
-
Fiberglass Driveway Marker Rod – Make sure it's round and 5/16" in diameter; these will be the shafts and insulated supports.
-
3/8" OD Thin Wall Brass Tubing – one 3' section.
-
Knick-Knack Shelf Kit – approximately 24" by 6". You can use any ¾" board you desire, the shelf included has a nice rail that will add to the overall look of the project.
-
Inline Skate Replacement Wheels – Quantity 2.
-
Lamp Parts – You will need a selection of lamp parts which may vary depending on what is available at your particular store. Pictured here are pull chains, finials, and ball nuts used to make parts of the charge collector combs and discharge electrodes. Also pictured are cabinet knobs which were not used in this project but would make good alternatives. See the charge collector construction step for details.
-
1" Copper Pipe Hangers – These you'll find in the plumbing section, they are copper plated steel.
-
Solder wick (not pictured) – for the neutralizing brushes, you might have to visit Radio Shack for this.
-
Rubber feet – Quantity 6.
-
Clothes Line Pulleys – must be plastic.
-
3/16" Acrylic Glazing – enough to cut (2) 14" circles from. Polycarbonate will work too and is easier to work with but costs more than twice as much.
-
Aluminum tape (not pictured) – found with the duct tape and HVAC supplies, get the kind with the peel off paper backing.
-
Rubber O-ring belts (not pictured) – available from McMaster-Carr, part number: 94115K259 about $15 for a package of eight.
The total cost of purchasing the materials new is about $100. However, these are all relatively common items so a little scrounging and perhaps some dumpster diving should net you significant savings.
Tools:
- Hack saw with fine tooth blade, coping saw, miter box
- X-acto knife, scissors
- Metal file, 400 grit sandpaper, #00 steel wool
- Power drill, various drill bits inluding 5/16", a counter sink, and multi-step bit
- #6-32 screw tap & handle
- Small soldering torch and/or large solder iron
- Miscellaneous screwdrivers and small pliers
- Tape measure, ruler
- Epoxy, cellophane tape, rosin core solder
I have thought about building one of these static Generators for years I am 60 years old and I am still intrested in science and electronics I made my first ion generator at the age of 10 years old using a car ignition coil although not the same I used to make plasma balls by getting an old filament bulb were the filliment had burnt out, by connecting the HT to one terminal and other terminal to negative ground side you could move your hand over the light bulb which would act like a plasma ball still was fun. Away what I was wondering could you not substitute the acrilylic discs by using some old 12 ” LPs or maybe the old Bakelite records advantage been you could get the LPs from a bootsale maybe cheaper they are a bit smaller then the 14″ discs but would make it easier to build. I will have a go either way at building this Wimshurst Electrostatic Generator all good fun at any age.
Do the collector brushes touch the sectors?
The collectors do not, but the neutrals do.
Hi Jake! Could 1/8″ brass rods be substituted for the bronze brazing rods?
You bet! The brazing rods are just cheaper.
Jake,
Thanks for providing plans for a really cool looking Wimshurst machine that really works! I have been collecting all of the various parts needed for the project over several months and finally got it assembled last weekend. The results are spectacular.This is by far the coolest thing I have ever built! So what are you building next? Lol , maybe a Van Degraaff generator? Cant wait to see
When I was 14, I made a Wimshurst. The 2 platters were made of glass. Isn’t glass a better insulator? Of course, glass is a head ache, it’s heavy, a glass place has to cut it for you, etc. Would it be worth it?
Glass is actually hydrophillic and won’t work well in humid environments. They used to lacquer glass disks in an attempt to keep the moisture out and would sometimes bake them to dry them. In general plastic is a much better dielectric than glass.
A book at the public library discussed the building of a “sectorless” wimhurst machine. The advantage they claimed was that without the metal plates on the disks, you wouldn’t get arcing across the plates. Any thoughts on these?
A friend built a large sectorless machine and it produces huge sparks! The only real drawback is sectorless machines are not self-starting, you need a source of charge to kick them off.
This was our favourite pastime as students in school in SA Ive been looking to build one of these for ages, years PS im 52 and still a big boy at heart We did attempt this when I was younger but no avail however seeing your article has re prompted interest in this magnificent machine
Hope you will publish far more on this
Thanks Mark! It’s actually a 5 part series, the rest of the articles are here:
http://steampunkworkshop.com/how-build-wimshurst-influence-machine-part-2/
http://steampunkworkshop.com/how-build-wimshurst-influence-machine-part-3/
http://steampunkworkshop.com/how-build-wimshurst-influence-machine-part-4/
http://steampunkworkshop.com/how-build-wimshurst-influence-machine-operating-machine/